Tuesday, May 7, 2013

Project 7: Household Goods Inventory Checklist


I know.

It is the geekiness in me.

I was in a store the other day, standing surrounded by specials on paper products and I wanted to buy some but I hadn't a clue what we needed. Given the smallness of my house, I had no idea what I would do if I bought extra and we didn't really need it.

So I left it.

 
I bought this lamp and shade when our very first Lowe's came to town. I was so excited to get a coloured lampshade. Throughout Season 5 of Mad Men, I was distracted to no end by these exact lampshades flanking the bed in scenes of Don and Megan in their apartment's bedroom. They have been replaced by subtly different ones this season.

Can you honestly believe how difficult it is to keep track of lightbulbs these days? It's almost a reason not to buy a lamp at Ikea which I recently and recklessly did.

 
The lamp from As-Is I installed in our master bedroom closet.


Thus, the need for the Household Goods Inventory Checklist was born.

It lists:

Cleaning Supplies
Personal Hygiene
Paper Goods
The contents of my medicine cabinet, and
Lightbulbs.
(Food wrap and storage is listed on the Pantry Inventory Checklist).

If there are quantities listed, that's the number of that type of item we need to have in use at all times. (Like toothbrushes -- 4)

I've also indicated where I will keep the extras--namely cleaning supplies, paper goods, and lightbulbs in the hall closet and personal hygeine products and medicine cabinet items in the pantry. I have yet to set that up in the pantry. But, I will.

I plan to fill it out when I do my once a month 10% off the first Tuesday of the month shop--which is today (yes, I prepared this post in advance. I had to.)

We'll see how it works out.

Monday, May 6, 2013

Project 6: The Dresser Drawer


It sat waiting.

About a month ago, I cleaned out this drawer in my dresser. Among other things, it had held the pieces to my daughter's horse picture framing project. I hadn't a clue, though, what I'd use it for.


Until the Universe conspired to show me.

Sometimes you don't know what you want until you see it.

The first thing I saw made me want it.

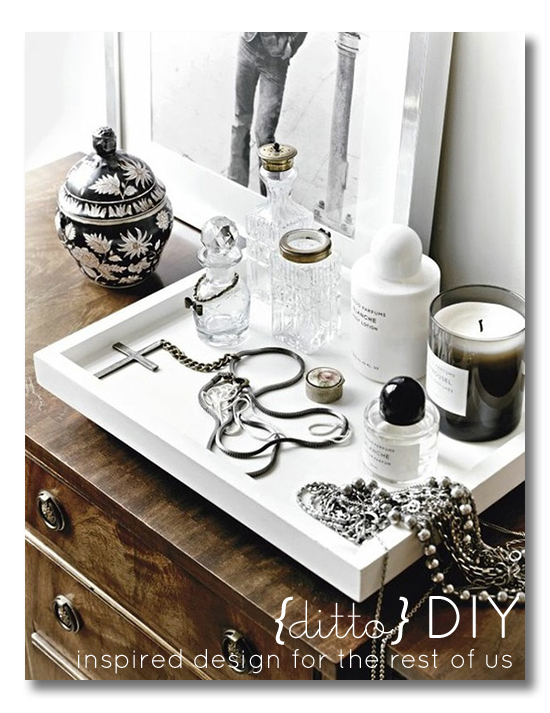
If you break this down, it is actually fairly simple. An elegant and simple square tray contrasting with ornate cut glass bottles, a candle in glass and a couple of clean lined round bottles and two loose necklaces. This is all about playing with black and white and contrasting colour, shape and material. Beautiful.


I thought about my tray and what was on it and sighed.


But, not long after I came across the game changer.


The second thing I saw made me realise I just might be able to do it (or something like it).


How obvious is this? How elegant a solution to dresser-top ugliness? Seriously, it has never occurred to me, in my whole life, that one could do this. My grandmother had a beautiful old 1920's dresser/vanity where she kept her brushes and combs on a tray and all sorts of interesting pots and jars lining the back, like ranks of mismatched soldiers. I thought that leaving things out was just what one did.

So, I took a left over organizing divider thingy from another project, put it in the drawer and started loading it up.


Done in less than five minutes.


As for the tray and what's left on it: I'm going to let it percolate a bit before I decide what exactly I want to do. No rush.

(Yes, organizing that jewellery all over the dresser is another project!)

For now, another Anti-Procrastination Project bites the dust!

Sunday, May 5, 2013

Project 5: Paint the Boot Shelf.

I thought I would get a bunch of the procrastinated painting projects done while I'm wearing my painting duds.


I have to wear painting clothes. As you can see, I am a very messy pinter. (These are in fairly good condition, actually. I have an entire wardrobe, both winter and summer, in more than one size. There are others in worse shape.)

Here's the boot shelf. It is at the back door, on the side of the stairs going down to the basement next to the furnace.

From left to right: chimney flue, gaping hole through which everything falls, furnace. I will explain that board with the dowels another time.

It has been ugly since the day we installed it.

I wanted some colour--and I wanted something I could clean in a snap.

I knew just what to use. The paint we had left over from this failed project, many years back.


Yes, the old red trunk. We still have it--it's in the basement (naturally!) and we still have half a can of that red enamel paint.

Ta Da!


While I was down there, I also finished off this area:

Before:


I stopped painting there during the laundry room make-over in the fall of 2011 because the old dresser was in the way. But now that the chemical cabinet is there and on castors, I could finally finish painting it.

After:


Only, you, me, and whomever needs that stuff from under the stairs will ever know!


I've other projects planned for the stairwell, but for now, it's another couple of Anti-Procrastination Project done.

Saturday, May 4, 2013

Project 4: The Story Behind the Chemical Cabinet

It used to sit here.


To the far right of the photo is the stairs. We moved this cabinet right to where that big black blob is, behind the green bucket. That's the old dresser with the rope pulls.


The kids painted it ages ago.

We wanted to put something else here. For that to happen, we had to move the light switch and put castors on this cabinet. (So it wouldn't block access to the things I have stored under the stairs.) And one more thing, I told my husband.  I had to paint it.

I went all Chez Larsson on it and brushed on a good thorough coat of clean white. But for some reason I didn't get around to the back. It sat at the bottom of the stairs taunting me...(though, honestly, it's voice was nearly drowned out by the taunts from the disorganized and dysfunctional Antonius-on-chains stairway baskets).


So, while I painted the shelves from the basement (here all prepped and ready for their Chez Larsson treatment)--


I took less than ten minutes and went from this:


to this:


This post took me longer to write!

Another Procrastinated Project done.


Friday, May 3, 2013

Project 3: Sending a Fax

It was worth some money to us.

Where do I begin?

With the new printer?

The old wifi box?

I had to haul it out of the "take it to the eco-centre" box to take a picture for you!


Let's just say I had to purchase on-line support to reconfigure our encrypted wifi after trying to set the wifi for our new printer de-encrypted it. There. That didn't take too long to explain.

Along with my on-line support came the offer of a $15.00 rebate for a new wifi box if I could not fix my problem after purchasing their technical support.

In a sense, they fixed our problem, I had encrypted wifi again. But, in another, the problem wasn't fixed as it wasn't stable. (It still isn't completely 100% trouble free, but I think it's the modem that's at fault, now.) On a subsequent call, the technician suggested I was entitled to my rebate and sent me an e-mail saying so.

So, we bought a new wifi box. A sleek pretty little black thing I can hide out of sight on my pull-out shelf.

Wifi on the left, modem on the right.

Very nice.

However, to claim my rebate, I had to fax a copy of my receipt along with a copy of that e-mail which said I was entitled to it.

Our fax machine is in the basement.

Aside-- (Ok, so technically, I can use the new printer as a fax machine--but I would have to figure out the phone cord thing all over again. And then learn how to send a fax. Believe me, using the old fax machine would be quicker! I did make the copies on my new printer, though.)

Yes, the basement.


The date on this picture is the same as that on my receipt. That was the day we moved the chest of drawers which had been here (with the fax machine on top) over to the other side of the laundry room so we could move in the paint cabinet (which had to moved to make room for yet another cabinet. The whole thing was so ridiculous, I never did blog about it.) But, as you can see, sending a fax would have been a tad complicated.


Fortunately, when I finally decided to send the fax, things had settled down somewhat.


Less than ten minutes later, we were ready to plug in the power and the phone cords


We don't have cable, so everything goes through our phone lines.

and send the fax.

We re-use paper my husband brings home from work. Documents are sent face down with this machine. And yes, it's old. I bought it probably in 1993 or thereabouts. That's NOT 20 years ago. It's not.

Bonus: The place where we keep the machine is now all nice and tidy.


It was immensely satisfying and the money won't hurt either!

Update.
The basement wall where the shelves used to be looks like this now:

 
and everything is just out of the above frame to the left!


If you're following along with my craziness during this month's Anti-procrastination Project, let me know! I love your comments.


Thursday, May 2, 2013

Project 2: My Daughter's Artwork


Project Anti-Procratination continues. (Ihope so! This is only the second day. I haven't quit, yet!)

This is another one of those spin-offs from the basement picture framing project. I found two pieces of my daughter's artwork already framed. The third piece was this. I think she did it two years ago, in grade five, maybe?


I really didn't think too hard about it.

Black is classic. Black works.


The hard part was figuring out where to hang them.


I used to have a great family wall in the stairwell: but one by one the pieces fell down. The nails and the nail holes are still there however--and a couple of frames have survived.


So, I figured, why not?

The whole point of taking this project is to get stuff done. If it isn't the perfect place, oh well. I will find that perfect place eventually, if there is such a thing. I actually considered postponing hanging these until I had weighed and considered all the possible options (not that there are that many, really!) But that would defeat the purpose of this month long Anti-Procrastination project.

I dusted the walls first, though. So glad I did. I don't know how walls get so dusty, but they do.


I washed them, too.

I've always wanted to put a picture here between the two bookcases. I figure it has to be more attractive than the boxes I had here all winter!


my aplogies to all green thumbs out there. This is a corn plant and I let it get dry a bit too often this winter.

So, here they are.


That stairwell looks a little bare but I'm not in any rush to fill it up.

(And h*ll yes, I want to repaint that stairwell--that yellow-green looks hideous to me now--why do you think I've neglected it?)

Linking to Jules at Pancakes and French Fries just 'cause it's Thursday and time for our William Morris get-together.

'Til tomorrow.

Wednesday, May 1, 2013

Project 1: The Horses

Back in the summer of 2010, our family took a vacation to the southern end of our province. It was a marvelous trip.

Throughout, my daughter kept asking me whether she should buy this or that for a souvenir. In a gift shop, somewhere, she came across a napkin that had been beautifully printed with four separate images of horses. She wanted it--and I told her we could frame each of the pictures to preserve it. Horses are a ubiquitous part of the southern end of our province and my daughter was ten--that perfectly horse-mad age for girls.

My daughter asked how much it was and as a lone napkin she got it for free.

I am not at all proud to tell you how long it has taken me to put together this project for her. I found the frames and the napkin in my dresser drawer last month and I took 20 minutes, just 20 minutes to put them together.

I left them on her bed--and when she saw them she asked me, "What are these?"

When I told her, she was thrilled--and then she asked me to hang them up outside her room for her. (The eaves slope in our upstairs bedrooms. Neither of us has much wall space.)

There were nails in the wall there already, but this isn't quite what I'd had in mind.

 
I am not about to let this particular part of the project languish for another three years, so I got out my tape measure, pencil and ruler, hammer and nails.


There. All better!

I thought it was a great way to begin this month's Project Anti-Procrastination!

Since this madness is all Tsh's fault, I am linking this first project to that last project, in her series, the "put off project."


Project Simplify on Simple Mom
 
That was sriously energising! I challenge anyone who has a project languishing in the dark corners of the house somewhere, to just go and get her done.


Related Posts Plugin for WordPress, Blogger...