Showing posts with label organizing. Show all posts

Monday, July 11, 2016

How to Sew a Spiffy Pen Quiver for your Bullet Journal*


*or any other book you like to write in! It does need to have a fairly rigid cover, though.


There's nothing worse than searching for a pen when you need to make a note. Well, except for asking for a pen to jot a note. I was at a meeting the other night--and I had my bullet journal to take notes--but no pen. Everyone else was taking notes on their phones, of course, so I didn't want to ask for anything so old school as a pen. Yeesh.

A pen quiver was past due.

It's quite easy, really.

1. Take two pieces of fabric you love.

They don't have to be different, but it is more fun if they are (and easier for a tutorial!)


 2. Measure.

A. Measure your book lengthwise.


B. Determine how much you want your quiver to overlap your cover on the back x 2.

C. Add on your seam allowance x 2.

A + B + C = length of both pieces.

You are essentially cutting the two pieces of fabric the same length and width even though the top piece will be positioned lower on the cover.  Later, you will simply fold down the extra fabric of the front piece to make a nice edge for your pen caps.


D. Determine the width you want. Add 1/2" for seam allowances.


3. Using the above measurements, cut out both pieces from your fabric.

I got carried away before I took the photo and started pressing on to a few steps ahead. 


For an 8 1/4" x 5" bullet journal, my pieces were 12 1/4" long x 3 1/2" wide.

4. Fold down the top piece where you want it to be relative to the bottom piece. Press.

I had started out thinking I would make side seams but when I pressed them together, I realised there would be far too much bulk. You don't want your pen quiver to be so thick it makes the left hand pages of your BuJo wobbly.


I folded down the top piece so that about 4" of the bottom piece remained in view.


5. Place the top piece of fabric over the bottom piece as you want them on your cover. (both right sides up). Align the bottom edges.

Turn the piece over so that the wrong sides are now facing you and fold back both pieces your allotted seam allowance (C).  Press. Sew. Cut off the corners.


6. Fold over the top piece and sew. Cut the corners.


7. Take your pinking shears and cut along both edges. I hope you can cut straighter than I can! If you don't have pinking shears it will be fine if you just cut with straight scissors.


8. Turn the piece back over and secure the top folded edge with pins.


My apologies, those pins should be lengthwise. This way they will get caught in the machine, as I soon discovered. In other words, pin the edge with the heads of the pins pointing left to right.

9. Sew both sides. I used a zig zag stitch, but you can use a straight one if you prefer.


Securing the elastic.

10. Fold over the bottom piece and mark where the elastic will go. You certainly don't have to place it as close to the edge as I did.  (I'm not sure why I did that, frankly!)


11. Sew the elastic to the fabric.


12. Place the quiver on your cover and fold over the top and bottom pieces. Stretch the elastic to the top until you have some --but not extreme-- tension. Mark.


No, I am certainly not the neatest sewer in the world. In fact, I'm pretty bad. As long as it holds, I figure we're good. That bookplate is from Tsh Oxenreider's e-course, Upstream. 


13. Remove, turn inside out and pin.


Again, please change the direction of the pin before sewing.


14. Sew the elastic to the fabric.


15. Turn your completed pen quiver right side out and slide it onto your cover.


I used an old elastic saved from some defunct pyjama pants--that's why it looks stitched. Old pyjama pants not required for this project. Just some elastic. 


Load up with your favourite pens.


And there you have it.

No more fumbling for a pen at the bottom that black hole better known as a purse.
No more embarrassing moments, whispering in the weird face phone glowing dark: "Can I borrow a pen?"

Linking up to these parties;
DIY Show Off: The Summer Edition.
That's What Che said: Monday Funday Link Party
Sand and Sisal: Inspire Me Monday


****************************************************
Want more? Have these posts delivered right to your inbox!


**************************************************

Monday, April 25, 2016

Make Room Challenge 3: Tackling the Paper Tiger.


In Week Three of the Make Room Challenge, Melissa Micheal's of the Inspired Room, challenged us to deal with our paper in the way she does in her latest book, Make Room . (affiliate link.)

I am late with this challenge because paper.

I hate paper. There is so much of it--and so very little we actually need--but my my husband will ask me for that one piece at any random moment and you'd think it's grounds for divorce if I can't produce it in three seconds or less.

So. No pressure.

Let's see what Melissa says we should do:


Make Room Challenge – Week 3 – Clutter and Entry. Make Room for Arrivals and Departures.


The arrival and departure areas of our home tend to collect quite a bit of clutter and often end up in disarray. We bring in a lot of papers, coats, schoolbags, purses, briefcases, sports equipment, homework, party invitations, and bills, and we track in mud and grime from outside. How do those clutter spots make you feel when they are out of control? This week, we’ll be setting up a sorting station so we can avoid paper pileups near the front door.

 This is my front door.

yep. That's my gorgeous dark blue painted ceiling. I need to give you a better look at that!


I cannot stand it when it is out of control. I cringe when people come up the sidewalk. If my husband is home, I sneak off to the back of the house and let him answer the door. Paper only piles up if someone else empties the mailbox. They put it on the blue shelf instead of sorting it...but that's all right. Me, I do not grab the mail when I come in the door. I leave it where it is until I am ready to deal with it. Then, I take it immediately into the dining room and open it.

3 Steps to Setting Up a Paper-Sorting Station

1. Find a spot near your entry or office area where you’ll take all incoming mail. Put a shredder and recycling bin near this station so you’ll be able to immediately deal with papers you don’t want. 

So, no shredder: but I reserve this garbage can strictly for paper. If I have food garbage or any other kind, I take it to the kitchen.

also known as the circular file.


After I've tossed the junk, the mail goes here:

If I got a bigger box, there'd just be that much more to sort.


as does every single other piece of paper in the house. It is my collection station and it is overflowing. But I know where everything is!


2. Plan to sort, shred, or recycle all the envelopes, newspapers, and junk mail, and put your bills in your previously designated spot every time you bring the mail in the house. Everything that is not a bill but has a due date or an upcoming deadline can go on a bulletin board with a clip or pin.

So, there are two kinds of paper--well, four, but first two. The first two broad categories of paper are 1) Action and 2) Reference.

Action breaks down into two more: a) those with a deadline and 2) those without. That's what Melissa is referencing above. Bills are just action papers with deadlines. So are dental hygiene appointments and a notice to order my son's graduation photos.

Reference is divided by time, too: a) near and b) far. In fact, according to Simplify 101 (not an affiliate link though it totally should be, I love them so much) reference (far) is actually called archival paper. And that needs to be waded through periodically and dealt with, too.


Here's the paper from that box divided like so:


Examples of a few things in the piles:

Action, deadline: auto club membership renewal, census notice, House lottery tickets. (I want to go see the houses, not buy a ticket.)

Action, no deadline: credit card agreement changes (I need to read it), a receipt for physiotherapy (needs to be submitted to insurance for reembursement.)

Reference, "near": recipes, (need to be put away), husband's vacation schedule, new prescription reembursement program. Most of my reference papers go into these binders on the expedit.


Reference, "far": bills paid, investment statement, photos. (Most of these are filed away in the basement. Not the most convenient place, but it is where there is space.)

Most of our reference paper goes into one of these binders. I'll explain how I handle all our paper in a future post.


3. If a paper is important and you’ll need to access it later, file it in a designated file box or drawer. Give each housemate an inbox if they will receive mail or have papers that enter the house.

Each of us has a personal inbox, right here. See those file folders. Yep. There. That.


It's been helpful for my husband to have a designated spot for all his paperwork while he's been sick. But honestly? The kids never check theirs. But I keep it so I have a place to put their stuff.


I put up this magnetic dry erase board last fall. I hope it is as close to a bulletin board as we ever get. I hate how messy they get--and things get lost on them, too.

Get Organized Tip: If your child comes home with special papers you want to keep, get a clear box with a lid or a personal file box with folders to store the current year report cards, favorite assignments, art, and other significant papers.

It is a good idea.

****************************************************
Want to know more about how I organize stuff? Have these posts delivered right to your inbox!


**************************************************

Sunday, April 10, 2016

Make Room Challenge Two: Primping and Pampering with Jewellery


I am part of a team to promote and publicize Melissa Micheal's latest book, Make Room for What You Love: Your Essential Guide to Organizing and Simplifying . As part of that, we are participating in weekly challenges to set up our homes to help us move through life with ease and grace. (I love that!)

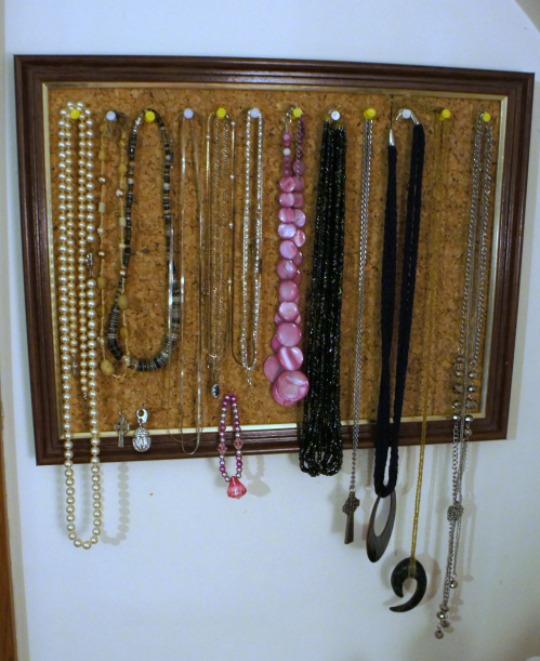
 Part of doing that, of course, is preparing the space to make yourself pretty and put together. The task last week was to organize our jewellery. About three years ago, I decided to keep my necklaces on a corkboard set into an old, unused picture frame. How I did that is here.

The necklace collection, 2013


That worked until this past January when I noticed the cork had come loose from the frame.


Rather than take the whole thing apart, I decluttered the necklaces I rarely wore (and I rarely wear necklaces, they just aren't practical for work) and inserted a band of cardboard along the top to hold the corkboard in and under the lip of the frame.

necklace collection, 2016


Unfortunately, the cardboard is not as attractive as it could be, but it gets the job done!

About the same time I made the necklace holder, I made an earring holder out of a frame and screening material. That did not fare as well. (Sort of like the first two times I tried to pierce my ears!)


It was just awkward to use.

Then, my daughter made this great ceramic dish and I wanted to find a use for it, so I started putting my earrings into it. It is now my official long dangly earring holder.


Studs go into the other, smaller ceramic dish.

It's incredibly easy to put on those finishing touches--and I quite enjoy seeing it all out there.


*This post contains affiliate links.*

****************************************************
Want to know more about how I organize things? Have these posts delivered right to your inbox!


**************************************************

Monday, March 7, 2016

Love Your Home Challenge: Day 9. The Home Binder.


I don't have any problem loving my home. I used to. There were parts of it I absolutely hated. I don't hate them anymore--but without renovations, they have remained awkward and difficult to deal with.

But, the best way to grow to love something is to take care of it: to invest time and energy. And yes, in the case of a room in a house, to make it pretty and functional.

To do that, you need a tool like the Home Binder. Accordingly, Melissa Micheals, who created the Love your Home Challenge, encourages people to create one:

Day 9 – A Home Notebook: Today let’s create a simple home notebook (or if you already have one, update it!). Set up a three ring notebook with dividers and plastic sleeves, or use a special bound notebook or an electronic note system on your phone or computer. Divide your notes by room so you can keep track of paint or fabric names, sketch floor plans or measurements of rooms and windows, lists of furniture or accessories you are looking for, keep garden notes, home maintenance/warranty information, and inspiration photos.


It's probably comes as no surprise to you, but I have had a "home binder" forever--and not just for this home. In fact, one of the first things I ever did whenever I moved into a new place was take its measurements and draw a floor plan. How else would you know where to put the furniture?

My home binder now contains floor plans and paint information, a wiring diagram and a cheat sheet for my light bulbs and fixtures as well as other things. But inspiration photos live on Pinterest, and garden notes as well as my warranties and manuals also have their own individual binders. My point is--what you keep in it reflects your needs at the moment.

I used to have a home binder almost exclusively devoted to the issues of organization and function(s) of each room. That's long gone, but I did discover some other versions of my home binder while I was clearing out the basement files last week. I found many old pages torn from House and Home magazine, articles on how to read decorating magazines, notes --handwritten-- on how to mix styles--how to visually raise or lower ceilings--make a room look larger--Jeffrey Bilhuber's favourite whites--all sorts of things. I may or may not do something on the blog with these.

But now--I most definitely want to paint my front hallway ceiling a darker hue!


****************************************************
Want to see that ceiling when it happens? Don't miss out. Have these posts delivered right to your inbox!


**************************************************

Thursday, January 21, 2016

The Medicine Cabinets


I did these not too long ago. Looking back, I see, to my shame, that I didn't even attempt to clean the shelves. I was probably rushed.

I was a tad rushed doing these, too.

The upstairs bathroom cabinet.

Those prescription bottles were empty.


I had to use my scraper to get up the gunk on the bottom shelf.


It was quite nasty. But it is all gone now, thank goodness!


Downstairs didn't take long.


You know how the organizing advisers always say to sort and keep "Like with Like"? They usually mean things like all the bandaids and bandages, etc should be kept together. But not in my cabinet. "Like with Like" means things of similar height will be grouped together.


I also did the cabinet beside this one. It took a little longer.
I forgot to grab a "before" shot!


This is all a precursor to the weekend assignment coming up, of course: cleaning the entire bathroom! I'll focus most of my efforts on the one downstairs. I need to clean and seal the grout.

It's really not going to all that fun.

****************************************************
Want to share in the agony? Have these posts delivered right to your inbox!


**************************************************

Thursday, January 14, 2016

Cleaning the Cleaning Closet


The stars aligned.

One of the projects on my project list just so happened to be an assigned Cure Project!

I first organized this closet--I call it the Cleaning Closet because it holds most of my household cleaning supplies--as well as other essentials like lightbulbs and hand towels and vaccuum cleaner bags--back during the Spring Cure of 2011.


It has been working well for me all these years--and I hadn't touched a thing, since.

So, as you can imagine, things were, ahem, dirty. Namely, the carousels, or lazy susans, if you prefer.


This project was only supposed to last 30 minutes. Didn't matter if we didn't get done, Janel said. Just start.

So I started at the top. Emptied everything out. Wiped down the shelf paper. Washed the carousels.

After 30 minutes I had this:


and this:


and this:


I couldn't very well leave it like that, now could I?

So, I swept out the bottom and then, carefully, put everything back.


I managed to fill one bag with trash (doorknob) and two bag with donations (floor). It was mostly stuff related to the dog we don't use anymore--including two stuffies. The animal shelter should enjoy them!


That felt good. A big win.


****************************************************
Want to know how this all turns out? Have these posts delivered right to your inbox!


**************************************************
Related Posts Plugin for WordPress, Blogger...