Showing posts with label bathroom. Show all posts

Thursday, June 15, 2017

Persevering in the Bathroom. An Update.

The bathroom, just as it is today.


I confess, when the sink bracket broke, I just didn't have the heart to continue in the bathroom for a good long while. Luckily, Chris kept going.

He rummaged through his incredible selection of odds and ends and found something called an "anti-tilt bracket." He figured he could make it work and thank goodness he did, because the blacksmith I called just laughed at me. We talked about trying a welder--but given how expensive labour is-- he'd probably laugh at us too for such a small job.


Thank God, it worked.

But it made the sink too high for her beautiful chrome legs. So, I hunted down some replacements --but we didn't like them-- and I don't believe they were any higher than our original ones. But they did give Chris the idea to use big washers to raise the height--so that fixed that.

So, looking it over, we have actually come a long way--just chipping away slowly.

Here was my "vision" board.

The light fixture turned out to be too large for the space--the door to the medicine cabinet would have had next to zero clearance, and the fabric is about 10x darker than this. Imagine that background a muddy grey and those white bits as bone coloured.


I never did show you my alternate plan. I made it when I was trying to decide which fabric to purchase. As it involved buying a new shower curtain, I rejected it. But that mirror frame sure would have been simpler to make!


And here was the to do list:

  • new fan 
  • new paint job
  • new light fixture
  • remove the tiles over the sink
  • create some sort of wainscoting
  • replace the old nasty black drain pipes with pretty chrome ones
  • new flooring
  • new window treatment
  • install new toilet
  • sew and install a new laundry bag
  • hang hooks for towels
  • put up shelves (maybe)
  • hang artwork
  • frame mirror

By week 5.  everything in blue and green was done. We had removed the tiles above the sink, nailed in the wainscoting, painted the room, installed the fan and the light fixture, and I'd sewn the window shade the day Chris and Ben put in the floor. I had also installed the pretty chrome drain pipes for the sink, but we were having problems with leaks. After Chris fixed the sink and adjusted the legs, he gave the pipes a good turn with the wrench--and they worked! No more leaks.

Isn't that purdy? So happy.

The sink caused a few glitches with spackling and sanding and re-painting the walls, but Chris persevered.

The toilet was apparently a nightmare. We purchased the tank already lined....and apparently it just causes problems when you try to attach the water line to it. (And yes, we needed a longer water line than the one we had, so another glitch. But easily solved.) Poor Chris just had a terrible time with it. We'd installed a one piece in the upstairs bathroom just before Christmas and Chris has sworn he'll never install another two piece again!

I just noticed I need to remove the tag on the water line hose. 


And it is high! You can actually see out the window while you are sitting on it.

I decided not to use the fabric from Tonic Living. It was just too dark. Instead, I headed out to Home Sense and browsed their table cloths and shower curtains. I wanted something with blue in it--and organic--like leaves or flowers. Both the mirror and the striped shower curtain have really strong geometric lines, so I wanted to counter that.

The best I could do was circles. It kind of talks to the floor.

The shade, right after it was installed. I love this shot. As soon as we put the toilet in, the room felt instantly crowded.

I got the hooks installed fairly quickly once I figured out how to do it. As the bathroom possesses our only tub and shower for four people, I needed them sooner, rather than later. Still, we had to wait 24 hours after they were installed before we could use them.


I'd had the laundry bag sewn up before the fiasco. I'd cut the old curtains apart and reused the fabric. I installed it just this week. I got fed up with everyone just piling their laundry behind the door!

Note how high the door is from the floor. Apparently you need two full inches in order for the fan to draw air properly to vent the moisture. Since we've done that, we have not had any water drip down the walls.

It is working well...and I love it, even though no one can actually see it beneath the towels!


I'm still working on the mirror.


It's coming along well, actually, though very slowly. If it were just a matter of making a mirror in a frame, we'd be done by now. It's complicated by the fact that it needs to be a door.


whoa, dusty!


I cut the horizontal wainscot board purposefully short so I could install a board there as the new right edge --and create a mirror centered over the sink. Of course, I didn't realise until much too late that the light was centered over the medicine cabinet--not the sink. Oh well.

I'd planned to install shelves, but I'm hesitating. I purchased glass ones from IKEA--and spray painted the hardware, so I can't return them ...but we seem to be managing just fine without them and I love not having the clutter.

I will hang some artwork, though. (I think.)

Ironically, I still have to clean and seal my grout! And I would really like to re-caulk the bath tub, too. I absolutely have to caulk behind the sink and around the toilet on the floor before too long.

In case you'd like to catch up on all the posts on the bathroom makeover, here they are:

ORC 2: Jumping in Relunctantly.
ORC 2a: Evaluating the Bathroom
ORC 3: Using Inspiration to Solve a Bathroom Design Dilemma
ORC 3a: Progress Report
ORC 4: Yellow Alert! Yellow Alert!
ORC 5: Tick Tock
ORC 6: Disaster


Thanks to all of you who have kept me going through all of this. I am getting anxious to get this finished and out of my life--so let's hope I'll have that reveal for you soon!

Thursday, May 11, 2017

ORC 6: Disaster


The worst possible thing has happened.

It has been quite the ride. Ever since jumping in late, this ORC has not gone well. I decided to "freshen up" our problematic main bath and try to make it look like it belonged to the rest of my house. Plagued with moisture and storage problems, I'd sort of given up on it.

So, when the ORC coincided with my little spruce up (new paint, cleaning the tile, and remediating the mold) I decided to give it the full on ORC treatment.

Chronicles of the One Room Challenge, Spring 2017, to date:

ORC 2: Jumping in Relunctantly.
ORC 2a: Evaluating the Bathroom
ORC 3: Using Inspiration to Solve a Bathroom Design Dilemma
ORC 3a: Progress Report
ORC 4: Yellow Alert! Yellow Alert!
ORC 5: Tick Tock

And just what is the full on ORC treatment?

That is me, living a fantasy where I'm a designer, a decorator and DIYer extraordinaire--where I belong with all the brilliant designers hand picked by Linda for the ORC. In reality, it's me working feverishly along with my husband (this time) and my mom (other times, and sometimes, but rarely, both) to decorate a room as best I can according to my vision--and budget (usually blown).

I think I am far too ambitious for the resources I have available to me. For the entire five weeks, I am STRESSED.

And then, when things happen--like you discover the light fixture you based an entire design around is too big (and the only other option --to make the ORC deadline-- is to buy another and spray paint it), or the fabric you chose is nothing like it appeared on-line and is much too dark, and the plumbing part is wrong, and you need a work around for a part you don't have--and then when the pipes are installed and they leak, and you fix them, and they leak somewhere else, and you fix that, and when they leak again and again--and you are about to fix them for the fifth time and you decide to level the sink because your husband has just put down the new floor (and made mistakes because he was tired and fixed them but it meant a quick trip to Home Depot for the third time that day to get a new threshold)--and then you get home dead tired, ready to level the sink and get the legs in their final position so you can fix that damn leak

and then,

while you're holding the sink up so your hubby can screw in the front legs,

you both hear a gigantic CRACK

and you say, "what's that?" thinking the pipes have snapped apart--

but no....

it's the ancient bracket holding your ancient beloved sink.

Gone.

Just like that.


And when that happens, I just want to give up and never, ever decorate again. (I have been tearing up all day.)

I called around, I went to several places, including Architectural Clearing House which is just what it sounds like---and he has a thousand and one parts, even a one hundred year old hanger for a wall mounted sink--but not my "very old and very rare" sink bracket.


the elusive bracket, still intact on the right side of the sink.


And all you can think is.....of course.

It's the ORC and what can go wrong, will go wrong. Not to whine--but nothing has gone without a hitch. Nothing.

I don't know when we'll be done. I am gutted I don't have a reveal. It kills me I won't be linking up with a finished room....not unless all the stars align and Linda keeps the linky open for a good while.

So, we'll see what happens.

Meanwhile, do check out all the others who have transformed their rooms in these five brief weeks. Amazingness abounds.

The chosen participants.
The guest participants.

They deserve all the praises.


Thursday, May 4, 2017

ORC 5: Tick tock

Oh migoodness.

doesn't every body have a chop saw set up in the kitchen?

I will say this: if it were not for the  One Room Challenge-- this little bathroom face lift would have taken me a lot longer. And I don't think I could have survived it.

ALSO--It definitely would not look as fabulous as I hope it will in just one short week.
One week.
Actually less, given it has to be photographed and the post written.

Eeeek.

Here's where we are now:


Here's the vision (partly):


Here's how we got here:

ORC 2: Jumping in Relunctantly.
ORC 2a: Evaluating the Bathroom
ORC 3: Using Inspiration to Solve a Bathroom Design Dilemma
ORC 3a: Progress Report
ORC 4: Yellow Alert! Yellow Alert!

And finally, here's the progress on our various little projects.


PAINTING


I got two coats of my Hague Blue on the upper part of the walls when I noticed some horrible spots that needed smoothing. So, less than an hour after the second coat, Chris had the sander out.

Then we removed the old light (not as difficult a job as we'd feared. It came out quite easily.) and discovered at least fifty years of crusty paint build up. So, that got sanded, too. There was a sizeable chunk missing from the wall--and the new light would not be covering that up, so I repaired it.

I used wet and set. After it dried, it was spackled and sanded until it was all smooth.

And we sanded, spackled and painted for another four days. ("We" means my husband. Man, am I grateful he's so patient.) The Hague Blue is in semi-gloss--so it shows every dang spot and ding. But where it is smooth --oh my-- it's like a still, deep, magical pool. Gorgeous.

I'm now in the process of painting the window.

Yay--green grass! That's the first we've seen it since last year.


WAINSCOTING
All the horizontal boards are in. Working on the verticals.

INSTALL NEW BATH FAN
I've learned more about bath fans and venting than you'd probably ever want to know this past week.

We had quite the time installing the new bath fan. I'd picked it up at Lowe's about a week ago. But when we went to install it Monday, Chris noticed that the flap in the duct housing did not close all the way. I jumped online but I couldn't figure out whether it was all that important or not, but we hopped in the car and ran to Lowe's for another one anyway.

In my research I had discovered that flexible hose venting --like we had-- can reduce the efficiency of the fan by 50% Good grief. We also discovered that we really need to lop off about two inches off the bottom of the door so the fan can draw air when the door is closed. So, we will do that.

It took all day Monday to install the fan. After our trip to Lowe's, Chris replaced the flimsy mounting board with something substantial. He had the housing  up --but fortunately had not attached anything to it -- when I noticed it wasn't centered. He graciously took it down and remounted it for me. Then we had to figure out the ducting. He solved it most elegantly with an elbow he had lying around in the garage.


Whew.

LIGHTING
Worried it won't fit!

DRAIN PIPE PROJECT

The drain pipe from the wall: it shall not be moved.


I've had an awful time with the plumbing. In short, in order to get this drain pipe in the wall to attach to my pretty chrome drain pipe, I have to use an ugly thing called a compression fitting. I thought I'd found something to hide the ugly thing--- but just as I was about to spend $50 US to ship a $12 plumbing part--- I discovered that the part was not, in fact, the dimensions I thought it was--but something entirely different and hopelessly inadequate! So, so glad I discovered that before pulling out the credit card! I think I've come up with an acceptable work around. I'll be doing up a whole post on it later, when the ORC is over.


FLOORING
It's here. Waiting.


TOILET
Ordered. Waiting for us to pick it up!

WINDOW TREATMENT
My fabric from Tonic Living arrived. I ordered it Thursday and I got it Monday. Amazing. But it was not AT ALL what I was expecting. It's not as vibrant as it looked on my computer screen. I am disappointed, but it is still pretty and it will do.


THE MIRROR
It is going to be so wonderful!


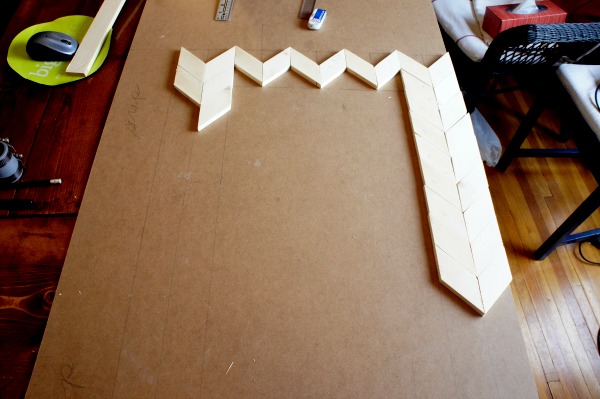
I played around with the pieces today and realised I was making it far too complicated. It'll be easy. I just have to cut a gazillion little half chevrons (anybody remember what those are called? parallelograms?), stain them and then glue the whole shebang. I am going to wait until I have the actual mirror before I glue it. Oh --and then I actually have to hang it-- as a door!

I should have the glass in my hands Friday.


I feel like I should be panicking, but I'm strangely calm. Maybe it's just because I'm so tired I haven't the energy to be anxious? Mostly, I'm just having fun and enjoying spending time with my husband as we work on this together.

As it should be, I think.

Do check out the other participants: especially the select 20 which Linda hand-picked to wow us with their designs. Some are very close to the wire. Here's the link via Linda's site, Calling it Home.

Then there are those, like me, the guest participants. So exciting to catch up on a handful each week. See them all here.

Next week: the reveal!

But until then....


Thursday, April 27, 2017

ORC 4: Yellow Alert! Yellow Alert!

Dear heaven, here we are --less than two weeks left. My husband has been struggling with getting the walls next to perfect and I have been struggling with decisions. But are ready to move on to the next stage.

Here are my previous blog posts about this project. I committed to this project in Week 2 when some quick touch ups took longer than expected--and we decided we may as well replace the toilet. And then the floor. And then the light. You get the picture.

That's this post here: ORC 2: Jumping in Relunctantly.

Then, I decided to lay out all of our problems with this room in this post: ORC 2a: Evaluating the Bathroom

For the third week, I posted twice. The first time I showed you how I use Pinterest to think through a design dilemma. ORC 3: Using Inspiration to Solve a Bathroom Design Dilemma

The second was a straight forward progress report: ORC 3a: Progress Report

So today begins week four. Week FOUR! (overall panic)

But first: this is where we are.

Not a whole lot further than last week, I'm afraid.


And this is where we need to be in about 12 days:


I cannot tell you how many hours I have spent finalizing this! I kept going back and forth on the paint colour above the wainscoting: light blue or dark? I couldn't decide what to do about the window fabric. Should I go plain--or fancy? I fell in love with a John Robshaw fabric--and though I sourced it at an astonishingly affordable price--shipping was atrocious.

The crazy endless uncertainty all started when I noticed the medicine cabinet over the sink was not centered.

Like so:

in case that green tape to the left there looks too wonky to convince you, notice the piece of green tape in the centre of the cabinet. Now, note where the paint stick is. Yep. Not centered.


THE MIRROR
I knew I wanted to put a frame around the mirror on the door to the cabinet, to dress it up a bit. But then, I realised it would bug me no end to have a new light centered over the sink ....but not over the mirror. And my design for the mirror frame called for a wider mirror anyway. The tricky part was figuring it all out.

So, if I can't actually center the cabinet--I can at least center the cabinet door, right?  So. A huge project awaits. I've bought my materials. I have a sketch. All I need now is access to the chop saw. I am going to make this:


Fabulous, isn't it? Very worried. Very, very worried.

I have to have the wood installed on the left for the hinge before we start the wainscoting.


WAINSCOTING:
Materials are purchased, primed and painted. Now that the walls are to my husband's satisfaction we can, perhaps, install the boards in the next couple of days. Under control.


FINISH PAINTING: You'd think that with only three colours being used we'd be done by now, but no. I just realised we've forgotten to do the door frame! And the upper part of the wall, above the wainscoting will be Hague Blue--the same as the door. No Worries. If the paint is drying while I take the reveal photos, no one will know but me!


WINDOW TREATMENT:
Outside mount, roman shade. I am using this fabric from Tonic Living.


I just ordered it this morning. Worried. 


DRAIN PIPE PROJECT:
I wish this wasn't important to me. But it is. I want my pipes pretty. I'll spare you the details, but this may not be possible without opening up the wall and ripping out the cast iron already there. (And that won't be straight forward. Not at all.) You can bet the husband is NOT thrilled about this one. In fact, he wants nothing at all to do with it, so I am entirely on my own with this one. Sweating bullets.

I started taping off to spray paint that 1 1/2" kitchen drain pipe white--and realised I really, really wanted the proper 1 1/4" bath drain in chrome. The question is: why did the plumber install the kitchen pipe in the first place? 


NEW FAN

I've bought it.

All we need is a sunny day to install it. Our wiring has it connected to the light. We're not going to bother messing around with that set up--though I made sure the new fan is much quieter than the old one! Under control.


INSTALL NEW LIGHT FIXTURE: It is sitting in a box right here beside me. Looks easy enough. The challenge will be removing the old one. Quite anxious.


INSTALL FLOORING
This turned out to be more complicated than it would seem. Sheet vinyl is not glued, it's held in place with the baseboards. We are not removing our baseboards. Instead, we will hold down the vinyl with the corner round--just like we did the stuff we installed a few years ago. But, that meant we had to buy new corner round. The profile we wanted (3/4" x 3/4" is the closest equivalent to what we have) wasn't available at our Big Box store--I had to source it at an actual moulding maker and retailer. It was fun visiting them, actually. We did that earlier this week.  So, that's all purchased, primed and painted. Under control.


Everything in blue has to happen before we install the floor and the toilet goes in!


NEW TOILET
Cross your fingers it is still in stock! We need to order it and pick it up...and of course install it! Anxious.


ALL. THE. LITTLE. THINGS:

A shelf for storage. Fine. If I don't have it in time for the ORC reveal, I'm not going to get upset.

Some artwork. Photography chosen. Frame purchased. It just needs to be spray painted flat gold. Under control.

Towel racks. I need to hang three large towels. (There are towel racks which will do that but they take up more space than we have which is only seven inches.) Slightly panicking.

Laundry Bag: Again, not something I am going to panic over if it isn't done in time, but I have my supplies--it's a simple matter of finding a couple of hours (if that) to sew it up. Under control.

Finish cleaning the grout and seal it. This is where I started this project! I was simply going to paint the room and clean. ha ha ha


Hope you are having a great week! If you are in the ORC like all these other fools along with me, best of luck to you!

And may you enjoy all that coffee you'll be drinking. I sure will!


Thursday, April 20, 2017

ORC 3a: Progress Report

At the very last minute, I decided to make over our main bathroom downstairs.

Here are all the posts in the series, so far:

ORC 2: Jumping In, Reluctantly
ORC 2a: Evaluating the Bathroom
ORC 3: Using Inspiration to Solve a Bathroom Design Dilemma


It's taken me a long time to find a direction--but I finally have it!

Here's one of my inspiration pics:


Here's where we're at:


The ceiling panels have been removed and they are being painted in the basement.


At the suggestion of one of my long-time readers, I decided to take down the tile over the sink. I still like it: but it has had its day.

I love the clean bare expanse above the sink! 


I've chosen some new sheet vinyl for the floor. Quite excited about that. 


Tarkett 12-ft W Grey Geometric FiberFloor Sheet Vinyl from Lowe's


I've also picked out and purchased a new light fixture. I looked at a gazillion--and discovered that lighting, for me, is the "starter" piece. I think this will create an elegant tone. 

from Lowe's by Bel-Air Lighting. I will be installing it shades down.


 But I am chewing my lip about getting the old one out.

How hard could it have been to center that fan? 


I would be freaking out--I still have the fabric for the window to pick out--and to sew. We have yet to purchase the vertical boards for our wainscoting...let alone install everything.  I am still trying to decide whether to replace the faucet set or not--and I definitely want to do something about the drain pipes under the sink! And, of course, we still need a toilet--and a new fan. 

But I know how these things go. It will be all very last minute and rush rush rush but it'll all work out.

Oh--and I nearly forgot--I want to do something with the frame round the mirror.

Dear Lord. OK. So maybe I am freaking just a little. 

Do see what the other Guest participants are doing, here. There are some great projects in the works! 


Wednesday, April 19, 2017

ORC 3: Using Inspiration to Solve a Bathroom Design Dilemma

My bathroom has a problem. Well it has a lot of problems, as I discussed in this interim ORC Post.

This particular one isn't uncommon in a bathroom. In fact, it has been solved in many ways, many times, sometimes rather ingeniously.

But I am getting ahead of myself.


Can you tell what it is?

Look at the ceiling.

Yup, there's two of them --and they're different. 

Now look at the walls.

It's not that we chose to end the tile "short" of where the ceiling ends (that's also, incidentally where we would run into the window, so it made sense at the time) --well, that IS a problem-- but the real problem is bigger than that.

It's that combined, what we did was effectively halve the room into two distinct parts. This teeny tiny family bath.

And the halves are not aligned. Which drives me crazy.

So, one half is the tub with its 4x4 tile. Blinding white. The other is the sink and toilet area with a planked ceiling and blue painted walls.

Meh.

This is a design dilemma of the first order. 

Do I play up the difference? Or try to unify the areas while adding just enough difference to keep things interesting? And, bonus problem, how can I integrate the planked ceiling--so it doesn't look like the random (but cool) feature it really is?

Here is a dramatic example of dramatizing the differences:


Cypress shiplap in tung oil finish. Gorgeous. And a complete and total contrast to the marble used in the shower enclosure. (There is a bit of a tie back to the enclosure with the marble countertop. It helps the two relate--as do the more formal sconces, I think.) 

But, oh my word, in my tiny bathroom, on my knotty pine budget? It's a way to go, certainly, but not, I think, the way.

This bathroom design is doing the same thing: playing up the differences.


Not only is there contrast in the materials, but in light/dark as well. Notice, though, that even here, there's a unifying element that crosses the divide, so to speak. The wood. It is essential. Repeated in both halves, the wood unifies these dramatically different halves of the same space. Without it, it would look like someone tried to put the ends of two different rooms together. 

Contrast between the tub/shower area and the toilet and sink area --but with a unifying element-- recurs over and over again in the bathroom, once you start to look for it.


I love this! The wood in the shower enclosure comes right out onto the floor and ceiling of the rest of the room. It's a great way to set the shower enclosure apart while integrating it at the same time.

This more traditional bathroom does the same thing:


In this case, the tile from the tub area is lowered and continued into the bathroom area. Choosing a horizontally striped shower curtain ties the two area together as well. 

At first, I thought the designer had used the same marble in both the shower enclosure and on the sink wall. But looking at them more closely, it looks like there's a fish scale pattern to the tile on the sink wall...and the tiles in the shower area are large squares.


To my eye, it reads as a "near miss," though over five thousand people liked it on Instagram! 

In this traditional bathroom, the marriage is more complete--but also more subtle. 

source 
Isn't that mirror frame fantastic?

This, too, had me fooled. I thought the tile wrapped around the wall behind the toilet and vanity--but no. That is just a brilliant match between the paint colour and the tile! Note, though, that the band of mosaic tile continues around the room--and the ceiling is the same throughout.

But it is encouraging. Look at how different this image is from the first ones above. 

So, here are my options, as I see them.

1) play up the differences: Uptown Meets Downtown

Take the planks on the ceiling back to natural.
Install similar planks horizontally on the walls, like the first image from House Beautiful above. Should I do the wall from floor to ceiling? Or just the waisncotting? Then, choose more "refined" looking lighting. 

2) In the light vs. dark example above, the bath tub and tile area is "light," the "dark" area is the sink and toilet. They are white porcelain--so they will "call" back to the white tiles area, anyway. But the ceiling and walls could be painted a dark colour. 

Honestly? No. Neither of these two. This house is just not that modern. 

Normally, I love contrast, but this room is too tiny to handle too much of it. I could leave the ceiling natural but paint the wood around the room. Like so:


That might help integrate the wood in the ceiling without making it overbearing.

Or.

I could meld the two ideas and keep the wood natural in the ceiling, duplicate it in the frame around the mirror and in some shelving. Then, I could paint the walls whatever I want. Maybe even go dark!

Like so:


and (imagine half this ceiling natural wood)


Ugh. Half the ceiling. These are gorgeous, but they just aren't working for me--because I am dealing with one half of the ceiling.


So. No.

The two ceilings have to be the same colour. They just do. They can be exactly the same, as in both painted the same --or they can be similar, as in a white washed wood and a white ceiling. Maybe. And if that's what I want to do, then, they are unified.

But to deal with the "randomness" of the wood half, all I really need do is repeat the idea of wood somewhere--white washed or painted, whatever I choose for the ceiling.

Then the question becomes--how much wood? 

This board and batten wainscoting is less intensive (and less costly) than planking:


We've come a long, long way from the first House Beautiful image above, haven't we? And though this image does not show a planked ceiling (never mind a partially planked ceiling) as long as the stiles are kept to the same width as my ceiling planks, I think it will work. Oh--and the wainscotting should be painted the same colour--to match the tile! 

So, it seems we've decided on a direction. Just in time--there's only three weeks left!

Related Posts Plugin for WordPress, Blogger...