Thursday, June 19, 2008

Scale

I am frustrated beyond belief, trying to create a landscape plan for my front yard. Fifty feet wide by forty feet long feels like an enourmous space on paper--but when I draw in two five foot shrubs to "frame" a seven foot Isanti Dogwood on the plan, I'm suddenly "out of room."

And now I know why. I have a small lot. Crazy but true. After a morning on Google, I have finally found a landscape plan drawn with measurements! It's from Taunton's excellent site on Garden Design in an article called "A Big Garden on a Small Lot". I clicked to it on impulse.


90 feet wide--90 feet is considered "small."
Good grief.

Wednesday, June 18, 2008

Week 3: GT: Shape

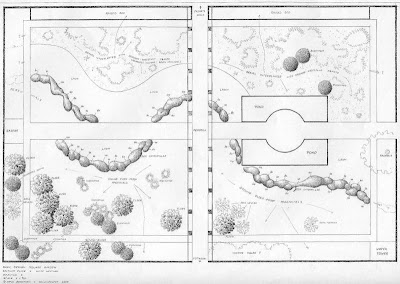
(Square Garden at Waltham Place, Berkshire)

One of the most basic steps after determining what "rooms" your landscape will include (and what their purpose should be) is to decide what shape they ought to take. You can either begin here...or end up here, depending on which way you prefer to work.

Whichever approach you take, you will want to have done a scale drawing of the area you're working with. Here's mine:

(That dot in the lower left corner is the flag pole.)

If you want to end up with your borders, you follow these steps:

1. Find your "main view"
2. Determine your focal point.
3. Frame your focal point.
4. Determine the secondary view.
5. Repeat steps 2 and 3 above.
6. Now, arrange the focal points. Imagine each little "nest" of frames and focal points is a piece of furniture and move them around on your scale plan of the area you're working with. Your focal points will lead the eye "around the room" so make sure it doesn't lead it to anything unpleasant (like the telephone pole, or whatever.)
7. Draw a border. You can do this two ways: a) draw a loose shape, equi-distant from each focal point, or b) simply trace the outline of the frames and adjust accordingly.

When I was playing around with this approach and sketches, I came up with this:


It's a nice plan, focusing on the entryway and making the most of that wretched sidewalk. In fact, that my efforts were on the right track was confirmed by a "front entry" planting plan I came across in a book. I re-created it and looked up each plant listed in order to get a feel for the layout. I made my own colour coded sketch.


Isn't it lovely?

(Another way to use the idea of a bouquet: just turn it on its side and find plants to "fill it in." Sort of a gardening 'paint by numbers' approach.)

But note this: once the blooms fade, there is nothing, nothing interesting here at all. Even if I switched out the plantings with conifers, dogwoods and grasses, the dominant perspective changes from looking in from the street to out through the windows, and so the plan (and the approach) does not work for me.

No, because "winter interest" is almost more important in this place where we have more days of winter than any other season*, I have to start with what will be left when summer is over, and that means the framework, the out-line, viz. the shape of the garden.

So, there are triangles, as we've seen, circles, squares, and rectangles, and of course, combinations. The recommendation is to go with the shape which is the "most natural" for the space.

I toyed with circles for a long time. I love the look of a circle within a square, especially.


And then, there's the circle "wheel" which I also love:

(Not one plant is over 8" high in this planting bed.)

But here's how circles/ovals would look in my garden:


Somehow, they're all out of proportion to the space and, unfortunately, don't really "fit."

Then, there are rectangles. I'm currently working on an idea with three long rectangles crossing the house and a center ellipse.


A "transparent" fence on the bottom, (12-13 feet deep) provides a low boundary and winter interest (it's deep enough for conifers to "back" a few dogwoods). The ellipse in the center gives us a limited amount of grass to mow and provides a focal point at each end. (Making the flag pole one of the "frames" for the focal point instead of the focal point itself was last night's inspiration)

The planting bed in the third rectangle, closest to the house, gives me all the "playing" room I want (and maybe more than I want.) The only disadvantage to this extremely linear plan is our wacky, nasty, sidewalk to the house. It was very poorly done and I think we both want to replace it. (Some day.)

So, this is another way to approach designing the landscape. It gives you a few bones on which to scaffold the rest of your plantings and plans.

*according to one source, on average, we have 145 "continuous frost free days" and 225 days "outside the frost free period" i.e., winter.

Tuesday, June 17, 2008

It's A Beautiful Day in the Neighbourhood

It's just across a major street from us (And soon to be across the tracks, as the city constructs Light Rail Transit to ferry folks to and from the University and the south of town).

And here I am, to bring you along, with my new haircut:


I'm not going to say much on this tour. You can just enjoy the evening. Remember, you can click any image for a larger view.


and just around the corner, in the alley, we find this:


Thanks for joining me on the walk.

Oh Dear--

Updated 5:10pm
After reading Zooza's and Anne's comments and feeling encouraged, I called to find out just how big that Thuja was I'd seen in the pot. Turns out it is about a foot and a half, "two feet at most"--and the helpful fellow also told me it grows into an "egg" shape--not a round shape. If I want round, I should be looking at 'Danica' or a 'Hetz Midget'. They turn into round ones. The moral of the story is still the same, though: I will have to "go slow." Small conifers grow slowly--it will take them 10 years to grow to maturity. (We may be able to afford the iron railing by then!)

Window shopping at the Nursery yesterday was an eye-opener. They want $30-50, per plant. The evergreen shrub I'm particularily interested in grows to 5 feet by 5 feet. (Thuja occidentalis, 'Little Giant') I know this isn't quite right: but that's about $10/linear foot.

I just called an architectural salvage place to see if they had any small sections of iron railing fencing. They do. It's $10 a linear foot (but he said I may be able to talk him down to $9).


My front property is 49 feet long across the front (not including the walkway) and 39'9" long to the sides of the house. (There's only two corners, in all that.)


So, my "plan" to do a 'transparent' fence of shrubs interspersed with lengths of iron railing is going to cost over $1,000.00


We can't do that. And I haven't even started on actual "pretty plants" yet. No wonder so many yards are barren wastelands with overgrown conifers.

See? I'm not the only one. Must have been a trend back when these houses were built, we see so many!

Where do I go from here?

I'm also becoming thoroughly discouraged at even being able to find any green "background" evergreen shrubs of a decent size (but less that 6 feet) that will grow in part shade in Zone 3. (Thuja does best in full sun and the shaggy, leggy bush in the front is a larger Thuja.)

Not sure what tack to take now.

Whimsy


No, not Dorothy's Peter (though that's what I'd call him if he were mine).

We went to a garden centre today, just to look around.

I'm full of ideas and absolutely in love with burgundy and chartreuse.

(Ninebark)

Sunday, June 15, 2008

GT Week 3. Colour: (Kill me now.)


I apologise for possibly being mistaken for a planted p.r. agent for P. Allen Smith. But after I read his book, "Colors in the Garden" last night, I feel like I can begin to tackle the whole conundrum. I'm going to do my best to encapsulate the advice he gives.

How to pick a colour scheme.

1) Connect the colours from inside your home to the outside.

  • If you have a peach, green and yellow scheme in the living room, repeat that outside the living room window.


  • 2) Reveal or conceal your home.
  • Reveal:

  • figure out the style of house you have, choose colours for your garden which reflect that style. e.g, choose warm Mediterranean colours for an Italianette home.

  • a note for brick home dwellers: if your home is a red-orange brick, don't pick any plants which may have a blue-red in them. They will clash. And vice versa.


  • Conceal:
  • Paint your home cream, tan, grey, or white. Then pick any colour scheme you like.


  • 3) Play off Nature.
  • Take a walk around a natural area where you live. Take the camera. Take pictures. Notice the colours in the "natural foliage." Use plants with those colours.


  • 4) Feature a Favourite
  • Pick a plant, any plant you like. Find every colour in it: every shade of green, every shade of whatever.
  • Pick a colour from a paint chip. Take particular plants you're thinking of using and place them against the painted board. Watch what happens.


  • 5)Embrace New Possibilities.
  • Buy flower arrangements which appeal to you and then find plants to match it.
  • Put new plants in pots. Move them about with each other and your other plants until you find a pleasing combination.


  • In all of this, be sure to contrast the textures of the plant and its foliage.

    Designing with Colour.

    Establish a backdrop.
  • make the backdrop uniform so the differences don't compete with the plants. (So, I'm dead on with wanting to paint the fence just a shade or two darker than the house). If two clashing materials must meet, you can place a simple divider in front, such as a green hedge, neutral coloured foliage, an arbor or trellis or other sorts of screens can be used to help "ease the eye" from one to the other.
  • the backdrop, whether shrubs, a trellis, a wall or a fence will be with you all season long. These define your boundaries.


  • One colour theme per "room."

    1) Monochromatic:
  • a soothing scheme can be had from a monochromatic scheme: every tint and hue of purple, for example. Sections of one colour can be separated by foliage. (I think he means different sections of the same colour, not different sections of different monochromatic schemes, but it isn't entirely clear.)
  • you can pick one colour per season within the same room.
  • Unlike interiors, however, there is no such thing as a purely monochromatic garden. There will be all the different greens of the foliage in there, too.
  • You can also "shake up" a monochromatic border over time, too, gradually introducing other harmonious hues as you go.


  • 2) Analogous:
  • He calls this "cousin colours." Bah. Simple: Choose all the colours you want, every tint and shade from within either the "warm" or the "cool" sides of the colour wheel. The plant world colour wheel is a bit different than what I'm used to. Yellow, apricot, orange and red are "warm" while blue, lavender to purple, pink and magenta are considered "cool."
  • In these schemes the proportions of colours is entirely up to you and whatever you prefer.


  • 3) Mix across the colour wheel.

    Here, proportion is important.
  • 1. choose a dominant colour. It will represent about 50% of your plantings.
  • Make sure it works with all the other things already present, like the house colour, pavement, the fence, deck flooring, etc.
  • Make sure there are enough plants in that colour which will grow well in the soil and light conditions you have to work with.

  • 2. Select three more colours which will harmonize or contrast with the dominant colour.
    Colour #2--about 25% of your plantings
    Colour #3--about 15 %
    Colour #4--about 10% (sparkle and accent)
    "The colours you choose and their ratio to one another is what creates a sense of harmony in the design." p. 60
    The percentages are "guidelines" of course.
  • 3. Throw in some pleasing neutrals!* You must! Yes, into each colour scheme. P. Allen Smith insists upon it. Calls them "seasonings" and what-not. (After Maxwell's admonition to create a room with a palette consisting of 80% neutrals, this is NOT hard to swallow.) Neutrals can brighten a scheme, tone it down, or harmonize.


  • Planting

  • Plant in large drifts.
  • Use odd numbers of plants in your groupings.
  • Establish rhythm with repetition.
    divide the length of the bed into five foot intervals and then fill a section of the border with a colour combination of six or so plants assembled in a pleasing arrangement. Before repeating the colour combination again,** create a pause in the border by planting a cluster of transitional plants in a harmonizing color such as gray or green, and then add your next color grouping. Continue this pattern down the length of the bed. In this situation the pauses or breaks between the groupings create enough definition to set up an interesting rhythm of colour. p.72


  • Use Time.
    I barely understand this, but I'm sure I will once I'm more familiar with the behaviour of plants.
  • As perennials bloom and fade, different ones can take "center stage" gradually altering the colour scheme of a given bed in a given season. The key to making it work, he says, is "to keep a constant colour scheme running through the garden as one colour segues into the next."


  • There's more, including lists of plants organized by colour. I highly recommend the book if you're interested.

    *The range of "neutrals" include: green, chartreuse, glaucos (blue-green), variegated, silver, white, tan to brown, and black.

    **Note he said "colour combination" and not "plant combination."

    GT Week 2 (revised). Plant Lists: The Workhorses.

    Read this post first. I absolutely cannot believe how varied plants are! The past two weeks have been amazing. And here's the really exciting bit--(ready for it Wende?) I have been making spreadsheets!

    First, I fell in love with conifers--I had no idea they came in "colours." (I'd sort of never noticed the blue-green ones before. I'd thought all the yellow ones were dying.) I got very excited about dwarf conifers until I realised they'd probably cost a fortune and that it was tough to get good colour out of the interesting ones in shade.


    Doesn't that just look like velvet? (Picea glauca conica)

    I was afraid too many conifers would be very static, however. So then I moved on to shrubs. And it's been a roller coaster ride of excitement and disappointment. (What do you mean it's zone 4, full sun, and likes acidic soil?** grrrr.)

    Texture is something that's been really interesting. Just as in Interior Design (though much more straight forward than in Interiors) there are two types. The first is the overall impression the plant makes--the second is the texture of the foliage itself.

    I've found the descriptions at Northscaping fabulous. I just open a spreadsheet, say, for grasses "hardy to Zone 3" and enter in sun requirements, height, spread, foliage colour (divided up into seasons), shape, texture and notes. Then, I grab a picture and put it on my hard-drive. This also gives me a handy way to record info found in the books, too. I just filled in part of a spreadsheet on all variations of green foliage plants hardy in my zone, that will grow in shade to part shade. There were over forty species! Now, I just have to go and fill in "spread" and other info my primary source didn't have. I did this to get started on narrowing down my choices for my "workhouse" plants.

    I will have dogwood. I must have dogwood. Look what it can become in winter:
    (This is a cultivar called 'Isanti')

    You may already know what your workhorses are. Remember these are the plants which will be used throughout the garden to "anchor" your other plantings. They will provide repetition, rhythm and unity.

    These are plants which will suit you sun/shade requirements, be in your zone*, and will provide an excellent foil for more colourful plantings.

    They can be perennials, deciduous or coniferous. They can be tall, medium or small--or all of the above, whatever your needs.

    So, figure out what they may be for you, if relevant, and post pics of your favourites! That's an "assignment" for this week.


    *More than one author I've read says she is able to grow plants rated two to three zones higher than that recommended by her area because she gets enough snow cover every winter to insulate the plants. I think that's wonderful and probably true, so you can keep that in mind when choosing your plants. We don't actually get most of our snow until March and the temperatures to worry about occur in January or February, here. For workhorses, I don't want to worry about it, at all.

    **Rhododendrons

    Related Posts Plugin for WordPress, Blogger...