Tuesday, November 29, 2011

Projects and Housekeeping


Projects and housekeeping don't live well together.

Not in my house.

One crowds the other out. It shouldn't. But it does.

It's weird.

The bathroom is still chaos. We're just about done...but not. I've no idea how much longer it will take.

The chaos was supposed to be contained to this area outside the bathroom (and my son's room, where my husband did some work) but it spread...

to the living room,


to the dining room,


to the kitchen, oh the kitchen!


and to my bedroom.

After the first couple of days, I stopped doing housework. Completely. I didn't wash a dish, I didn't sweep the floor, I did nothing.

But today, there's a lull in the project. My husband has returned to work and there's not much I can do. So, I decided to clean the house.

A logical move, you'd say. The right thing to do, even.

Regardless, even if I wanted to do something else (like work on the Christmas newsletter) I couldn't. I couldn't focus on anything.

All I could see in front of me--everywhere I looked--was the chaos. It was the only thing I could do today.

But still.

Still, there was this voice in my head, saying:
Why are you cleaning up? It's just going to get messy again. You should be working on the project. You need to get that done. All this can wait. It's not important.What are you doing this for?

I just let it natter on....

  • I made the bed and picked up the master bedroom.
  • I did some laundry (though I can't find the bottle of bleach.)
  • I tidied and picked up and put away--with the timer.
  • I tidied and picked up and put away--without the timer.
  • I washed the fixtures--and the downstairs bathroom floor. (You should have heard the clamour in my head--and yet--the satisfaction when I was done was deafening.)
  • I did dishes and swept, and swept, and swept.
  • My son vacuumed.
  • I washed the kitchen floor.

And, now, at the end of a most excellent day, I present to you...

The living room:


The kitchen:

(Don't mind the extension cord. There are no three prong plugs in the dining room and we needed to plug in the laptop.)

The dining room.


Now, I can think about other things.

Like those dratted newsletters.

Thursday, November 24, 2011

Tales from the Tub Surround

Warning: We are the slowest DIY renovators in the Universe. Seriously. You will have to have your super spy-ware X-Ray vision glasses on to see the miniscule changes from one day to the next. Got 'em? Ok, let's roll.

Day Minus One
Saturday.

We order the kids to take one last bath.

Day One:
Sunday.

I take my last shower inside the nasty, nasty thing.


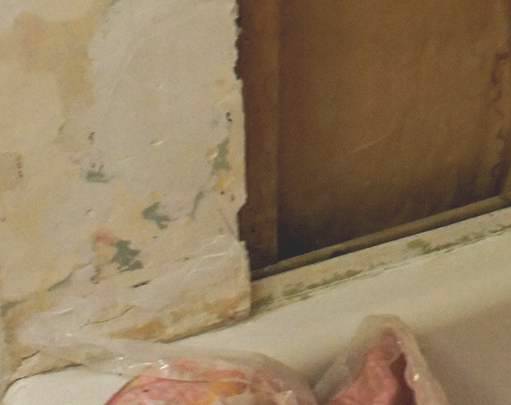
The shower curtain is still wet when Daedalus (my husband, not his real name) takes down the shower curtain rod. There's our first surprise: It is white underneath where the rod was attached. What we have been living with is not the odd off-white choice of someone with bad taste but with yellowed plastic.


It takes only minutes to remove it all. Underneath we find two different kinds of drywall. This is the same corner as the first shot: the top (blue) has what we think is original to the house the brown stuff is what someone else put in.


The brown stuff is all water damaged, so we decide to rip it all out.


And then we discover mold--on the other side of the studs--in other words, inside the wall.


Day Two:
Monday.

We take a trip to the hardware store. We get a crash course in using waterproof materials in the aisle of Home Depot and all the various methods available to us.

At home, we decide to take down some more wall to see the full extent of the mold. It's bad.

This picture was taken after I'd begun the clean up.

That wall includes the stairwell. See those horizontal boards in the upper left corner? Those are the stair treads!

Its also the wall in our back entrance way.

We drilled a hole through the gyp rock to figure it out. Here's the hole from the bathroom side: (I put a red pen cap on the drill bit to help you see it!)

I took this photo today.


and from the entrance way:


We decide it will be beyond our abilities for us to take it down and build a new wall: so I get on the Internet and figure out how to deal with the mold.

I followed the directions on the CMHC web site: namely, wash with water and detergent and dry it. Where the wood was contaminated, I washed it and then had my husband sand it. We then vacuumed everything.

I have no idea if what we did was the right thing to do. There's a ton of advice out there--and there are products available in the States--but not here--which you can use to prevent it's return.

Whatever. We dealt with it. Hopefully, forever.

Day 3:
Tuesday.

We decide on what we're going to use: cement board on the long wall and some sort of "backer board" for the two end walls where Daedalus wants to patch into the existing walls. I argue for ripping out all the walls around the tub all the way to the ceiling (and replacing the insulation on the outside wall) but I'm not successful.

We also decide to use the very pricey but state of the art Orange Schluter/Kerdie membrane for waterproofing.

Daedalus rips out all the old caulking around the tub. It was one of the things we hated about the tub: the caulk seemed to go on forever--and mold grew through it.

Then, I began to research what we're going to do about the lip of the tub, or tub flange.

It's that vertical bit at the very edge of the tub--some of it disappearing behind this old wall. That bit of wall will be removed by the end of this post!

We learn about all kinds of things, like

1) the flange will move when someone gets in the tub.

2) thus, the board you are using for your walls should not touch it.

2a) One option to avoid touching it is to build out the wall so that goes out over the flange and encloses it supposedly without touching it. We didn't have a lot of faith in this option, actually.

The folks who installed the walls we took down--why yes, the very walls with the water damage--had cut a groove into the drywall and installed the flange up and into that groove.

Nonetheless, picture above notwithstanding, they had not brought the wall board down to the edge of the tub, but left a gap--and did nothing to fill it. No tape! That was why our caulking seemed to go on forever--it did! When we caulked we were simply filling the gap underneath the wall to the flange. Does that make sense? If it doesn't, not to worry. I'm over explaining. As usual.)

3) there is such a thing as fiberglass "tape" and this is what we need to "connect" the wall with the tub.

4) "Thin-set" = "drywall mud" in the tub/shower area.

We decide that we don't need the furring strips where the cement board is going to be installed and we take them out.


Good thing, too. There's more of the nasty black stuff underneath them.

That takes most of the day, actually, in between bouts of cleaning the dry wall.

Day 4:
Wednesday

Daedalus spends a great deal of time cutting the board which will fit over the plumbing.


I research how I am going to build a niche into the wall for holding shampoo and soap and such-like.

Day 5:
Thursday

I decide to go over all the previously moldy areas with a solution of bleach and water.

Hard to believe it's the same wall, isn't it?

We put up one of the cement boards.


Daedalus fits out the wall with the plumbing.


We install the backerboard.


At the other end of the tub, the hole in the wall goes from this:


to this:


Daedalus is going to let me remove the old insulation in there (what appears to be water stained paper bags) and put in some of the left over pink from the basement. Wish me luck. I really have no idea how we're going to get it in and up.

Thanks for reading through all this. I'm sorry it was so long-winded!

Saturday, November 19, 2011

Christmas Progress.


Sunday is planning day, so here goes.

Done:
--Outdoor Lights

--First draft of the Christmas newsletter.

--Photos selected for 2012 Calendar.
--Quotes selected for 2012 calendar.

--I have made a list of Christmas events we want to attend and entered the dates onto the calendar.

--All addresses for Christmas cards entered into one document onto the computer and printed out and put with the cards.

To do this week:

(Aby recommends that after you have made the Master list of everything you need to do that you sit down and plan each week as it comes. That way you can keep the overwhelm to a minimum. I hope it works!)

--Determine Teacher Gifts
--Collect materials for a homemade gift for my nephew.
--Shop for Christmas gifts and stocking stuffers.
--Plan holiday decorations.
--Plan Advent Activities
--Design Calendar.
--Get photos for Calendar developed
--Get photo for Christmas Cards developed

Of course, this week is also all about the downstairs bathroom: fixing the wall, tiling the tub surround and painting the ceiling.

Now there's an even BIGGER hole in the wall. Wait--there's no wall there anymore.

Just in Time

Yesterday:

Four windows upstairs, two down.

Before:


After:


Then we went to my Mom's and plastic'ed up two skylights in her eating nook.

Today:
Minus 20 C right now( -4 F)
Expected high: -17 today (1.4 F).
We're not even going to mention wind chill.

I cannot say how grateful I am that a fund raising bottle drive for Girl Guides scheduled for today was cancelled. I just found out minutes ago.

Tuesday, November 15, 2011

Christmas Motto

In Get Organized for the Holidays, at Simplify 101, Aby recommends we come up with our "Holiday Inspiration" statement --you know, something to capture your vision--or the feel-- you want for the holidays.

My inspiration statement goes something like this:
This holiday season we will be cheerful, kind and gracious to one another as we create and celebrate the joy in every day.

Yeah, OK, a bit of a wordy mouthful.

But the expression "Be of Good Cheer" resonates perfectly. I'm calling it our motto for Christmas this year.

Aby encourages us to find a way to "artistically express" our inspiration statement. Being the unimaginative sort that I am, I had thought I would do a simple fabric banner.

When I couldn't find the fabric I wanted (teal and red seem to be hard to come by this year). I decided I'd do it in scrapbook paper.

Before I could let the idea of all that hand cutting of the letters get me down, I saw this fabulous sign at La Famille.

for purchase at her etsy shop.

I want to give Alicia full credit for this: there's no way I could have thought this up on my own.

Here's my version:


I had fun making it.

Quick Before and After

I couldn't resist.

Once I had my project area cleaned up, I had to do a project!

Before:


After:

No, I haven't painted the walls. This is what happens to them when there's snow outside my ginormous front window.

Inspiration:

source: Porter Design Company via House of Turquoise

Good grief. I just noticed the feet! I thought the idea for the feet had come from a post Jenny had done eons ago at The Little Green Notebook.

Linking to the 40th Wow Us Wednesdays at Savvy Southern Style.

Saturday, November 12, 2011

The View From Here

the dining room window (taken yesterday)

and here:

the living room window (also taken yesterday)

is dismal.

If you have been reading this blog for a while, you will know that I have been wrestling with landscaping my yard since the summer of 2008.


The way things were.

I planted a Mock Orange and a Hydrangea near the house this year: I think both have died.

I found this fabulous web-site by a visionary landscape designer/garden planner which I know Anne will love. The blog is called Vanishing Threshold and its author is Tara Dillard.

She believes in creating views to be seen from the house, establishing a diverse habitat in the lawn to maximize pollination, using shot pea gravel and not using foundation plants. (Which is perfect for me--have I mentioned my Hydrangea and the Mock Orange? How about the Dogwood I planted the year before last which is barely hanging on?)

She posted this image of a garden and it instantly captivated me.

from The New York Times. photographer: Randy Harris.

No surprise, I've been up to the wee hours of the morning planning my front yard.


This centre box would be planted with hellebores, ferns and hostas. (One of Tara's Trinities.)

Can you imagine it?

I can. And it is the first time I have had something captivate my imagination so completely I can see it almost right down to the last detail. Almost.

Remember Spring? I want to hit the ground running next year.

Pro: I may already have the materials I need for the centre planter box. We have old railroad ties waiting by the side of the house.

Pro: I get to rip up that sidewalk.

Pro: It's not a big planting area. I just may be able to take care of the small number of plants this requires.

Pro: I love the idea of a partial "tapestry" hedge. Moving my shrubs out to the front would not only give me a gorgeous view of them from my front windows but it might save their lives. Have I mentioned the Dogwood, Hydrangea and Mock Orange?

Pro: This plan allows me to expand. If I want to plant sedums or rudebekias or pupera or phlox or grass even another Thuja in the corners I can.

Pro: I fell in love with gates, recently.

Pro: It will hide the foundation--without planting up against it.

Con: I may get really annoyed with having to skirt around the centre "plant island."

Con: I need a focal point. I don't want to spend a ton of money, yet I want something tall and architectural.

Con: Boxwood doesn't do well here.

Con: I really don't know what to do about that flagpole.

Con: This plan may be altogether too formal for my modest little house.

From the street sidewalk, opposite the front door, taken today. Just look at that wonky sidewalk--I mean, what else is there to look at? (sigh).

Friday, November 11, 2011

Lest We Forget


In Flanders Fields
By John McCrae

In Flanders fields the poppies blow
Between the crosses, row on row,
That mark our place; and in the sky
The larks, still bravely singing, fly
Scarce heard amid the guns below.

We are the Dead. Short days ago
We lived, felt dawn, saw sunset glow,
Loved and were loved, and now we lie,
In Flanders fields.

Take up our quarrel with the foe:
To you from failing hands we throw
The torch; be yours to hold it high.
If ye break faith with us who die
We shall not sleep, though poppies grow
In Flanders fields.

source: Wikipedia.

Wednesday, November 9, 2011

Kitchen Soffit Stencil--Done!

All scrubbed and touched up--she's ready for her close ups!


Please note how imperfect this is. I did it by hand, of course, perched precariously on my counters--or on a ladder. There was no way it could be perfect. And you know what? It doesn't matter, anyway.

This is where you see it.

When I started painting my kitchen cabinets and window trim, I hadn't intended to paint the soffit. I'd wanted to, but my daughter put up such a fuss that I thought I'd let the old stencil be.


But that was before I painted the cabinets.


Awful! Dingy! Too 1990's! (Though, I did it in 2000 while I was pregnant with my daughter. I'd ripped off an old strip of wall paper that had been up there--and without priming--stenciled right onto the plaster. There was no way to clean up all that yellowing.)


If the white cabinets sang, the soffit was like a relative who stands next to you in Church singing cheerily off-key. (I have one. She's charming. Just not singing.) So, one day while my daughter was at school, I slapped a coat of primer all over those grapes and vines.

And then I painted it white, like the cabinets, just in time for Thanksgiving.


My mom mentioned they looked "cold." A bit stark. "But knowing you," she said pointing upwards, "you'll do something with that space." I pointed to the photocopy on the fridge.

She laughed.

I had seen a stencil on a soffitt a few years ago, somewhere. It was a trellis or a bella porte design or something. It might have been in yellow. I think it was over an island, maybe. I spent a few evenings on-line trying to find it again but I couldn't.

So, I started looking at stencils on-line. I found quite a few contenders from Royal Design Studio. But I decided to go with one I had found as a free download many months ago.

I played around with scale to get the best representation of the design to fit the space I had. I ran it off the computer, taped it to a file folder and began to cut it out with my eXacto knife.


I wasn't going to make it.

My hand was already cramping and cringing. I couldn't see how I was going to do such delicate work with my head pressed up against the ceiling. This is not the Sistine chapel, I am not Michelangelo and the Pope isn't paying me, either.

And I was beginning to realise something else, too. To get it the way I wanted (black lines against a white ground), either I was going to have to paint the soffit black and pounce/stencil the white paint into the spaces (which is nearly impossible without stencil paint which I can't get locally) or use the stencil to draw the design onto the soffitt


and go back and fill in the lines with black paint.


Which, obviously, is what I did.

So, today, I cleaned up all those graphite smears and touched up the obvious splotches. I didn't tidy up the lines.


I love it. I think.


Does it look a bit like embroidery to you?

Linking up to The 147th Metamorphosis Monday at Between Naps on the Porch. Welcome to all visiting from the party!

Related Posts Plugin for WordPress, Blogger...