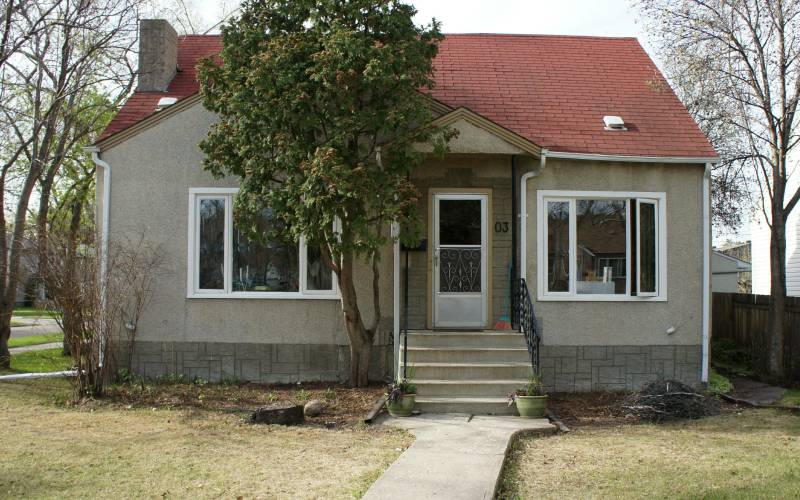
In some ways: so much changed!
In others, not so much.
Makeovers inside the house tend to be decorative in nature, low budget and somewhat easily changed.
Changes made outside, though, tend to take much longer (sometimes several years) and are somewhat more permanent. They also tend to be done by my husband!
However, there are a lot of pictures--and it may take a while to get through the whole post. I advise a good beverage.

Showing posts with label Garden. Show all posts
Showing posts with label Garden. Show all posts
Tuesday, September 8, 2015


Thursday, May 23, 2013
Project 23: Plan the Vegetable Garden

When we first built our vegetable beds, I bought two very useful resources; a book, Guide to Canadian Vegetable Gardening,* by Douglas Green, and a special edition of Mother Earth News magazine.

The magazine had an article on crop rotation. In that article, it grouped the vegetables by family. I'd never seen anything like it.
These are the family groups:
A. Onion family: onion, garlic, leeks and shallots
B. Carrot family: carrots, celery, parsley and parsnips
C. Sunflower family: lettuce, sunflowers, and a few other leafy greens
D. Cabbage family: cabbage, broccoli, Brussels sprouts, kale and many other leafy greens as well as rutabagas and kohlrabi
E. Spinach family; beets and chard
F. Cucumber family, cucumbers, melons, squash and gourds
G. Pea family: peas and beans
H. Grass family: corn, wheat, oats and rye
I. Tomato family: tomatoes, eggplant, peppers and potatoes (though I have a not never toplant tomatoes with potatoes. I don't remember why.)
So, planning our vegetable beds was a simple matter of figuring out what we want to grow this year and making a list.

Next, I grouped the seeds into the families above. They are very helpful for planting in beds. I allot one bed per family.
Then, I consulted the crop rotation diagram I made in 2011 and figured out where to put my vegetables and I made up a new chart for this year.

This is what I gave my husband when he asked me where I wanted things planted.
While I was having fun doing the planning, my husband and son dug out the odd numbered beds (as it is an odd numbered year) and amended them with compost. We should have added peat moss, but we were lazy this year.

So, almost on schedule, we planted the vegetable beds. (Of course, by "we" I mean my husband.) I suppose it doesn't matter that much if the planning is late--as long as the planting isn't! In case some of you think this is late, we live in climate zone 3a. The traditional date for planting here is the May long weekend (around Queen Victoria's Birthday) which we just had.

We're in the midst of a bit of drought at the moment, so here's hoping all goes well. Linking to Jules at Pancakes and French Fries for the wonderful William Morris Project.
*This post does not contain affiliate links.
Saturday, September 8, 2012
Photo-A-Day, Days 2 thru 7
For Day 1, go here.
Day 2: Father

Day 3: Far Away

Day 4: In my Postbox/mailbox

Day 5: Bright

Day 6: Every Day

Day 7: Natural

#FMSphotoaday
Day 2: Father

(soc)
Day 3: Far Away

Day 4: In my Postbox/mailbox

Day 5: Bright

Day 6: Every Day

Day 7: Natural

(soc)
#FMSphotoaday
Monday, May 7, 2012
Weekend Project: Flower pots.
Spring!

I didn't get a whole lot done this weekend. Our hot water tank started leaking Thursday night and had to be replaced--fortunately we found someone to come on Friday and install a new one. The old one was 19 years old.
So we're rebuilding our emergency fund.
I didn't feel comfortable putting on my painting clothes and finishing any projects on Friday. Saturday was busy with Girl Guides during the day and Scouts in the evening, but I did manage one small project on Sunday:

The tall grassy thing is Dracenea, the yellow flowers are pansies, and the trailing plant should be lobelia. I also put in a few white Alyssum plants just because I like them.

I did two: one for either side of the steps:

Pleasant enough.
(Those are extra pansies on the steps. I think I'll return them.)

I didn't get a whole lot done this weekend. Our hot water tank started leaking Thursday night and had to be replaced--fortunately we found someone to come on Friday and install a new one. The old one was 19 years old.
So we're rebuilding our emergency fund.
I didn't feel comfortable putting on my painting clothes and finishing any projects on Friday. Saturday was busy with Girl Guides during the day and Scouts in the evening, but I did manage one small project on Sunday:

taken last night, in the evening sun
The tall grassy thing is Dracenea, the yellow flowers are pansies, and the trailing plant should be lobelia. I also put in a few white Alyssum plants just because I like them.

taken today, in the noon time shade
I did two: one for either side of the steps:

Pleasant enough.
(Those are extra pansies on the steps. I think I'll return them.)
Saturday, November 12, 2011
The View From Here

the dining room window (taken yesterday)
and here:

the living room window (also taken yesterday)
is dismal.
If you have been reading this blog for a while, you will know that I have been wrestling with landscaping my yard since the summer of 2008.

The way things were.
I planted a Mock Orange and a Hydrangea near the house this year: I think both have died.
I found this fabulous web-site by a visionary landscape designer/garden planner which I know Anne will love. The blog is called Vanishing Threshold and its author is Tara Dillard.
She believes in creating views to be seen from the house, establishing a diverse habitat in the lawn to maximize pollination, using shot pea gravel and not using foundation plants. (Which is perfect for me--have I mentioned my Hydrangea and the Mock Orange? How about the Dogwood I planted the year before last which is barely hanging on?)
She posted this image of a garden and it instantly captivated me.

from The New York Times. photographer: Randy Harris.
No surprise, I've been up to the wee hours of the morning planning my front yard.

This centre box would be planted with hellebores, ferns and hostas. (One of Tara's Trinities.)
Can you imagine it?
I can. And it is the first time I have had something captivate my imagination so completely I can see it almost right down to the last detail. Almost.

Pro: I may already have the materials I need for the centre planter box. We have old railroad ties waiting by the side of the house.
Pro: I get to rip up that sidewalk.
Pro: It's not a big planting area. I just may be able to take care of the small number of plants this requires.
Pro: I love the idea of a partial "tapestry" hedge. Moving my shrubs out to the front would not only give me a gorgeous view of them from my front windows but it might save their lives. Have I mentioned the Dogwood, Hydrangea and Mock Orange?
Pro: This plan allows me to expand. If I want to plant sedums or rudebekias or pupera or phlox or grass even another Thuja in the corners I can.
Pro: I fell in love with gates, recently.
Pro: It will hide the foundation--without planting up against it.
Con: I may get really annoyed with having to skirt around the centre "plant island."
Con: I need a focal point. I don't want to spend a ton of money, yet I want something tall and architectural.
Con: Boxwood doesn't do well here.
Con: I really don't know what to do about that flagpole.
Con: This plan may be altogether too formal for my modest little house.
 From the street sidewalk, opposite the front door, taken today. Just look at that wonky sidewalk--I mean, what else is there to look at? (sigh).
Monday, November 7, 2011
Housekeeping Update

Now that the 31 Days of Housekeeping are over, I've pretty much stopped dead in my tracks. Well, OK, that's an exaggeration. I've done a little something almost everyday--but not the full blown routine every single day--which is what it takes to keep this place from overwhelming and paralyzing me (which leads to more mess, more overwhelm and more paralysis).
So, today, I vowed, I would do absolutely every little thing on the list and get caught up. Of course, getting caught up means doing more than what's on my little list; chiefly, more loads of dishes and more loads of laundry.
So, I weighed myself (distressing: the numbers really are trending upward.) Made my bed. Oops, forgot to swish and swipe the upstairs bath!
But I did manage the downstairs bath and did about three loads of laundry or so. I picked up most of the main floor. (The desk is still a mess.) Where I fell down, of course, is in doing the dishes.
Not to worry, though, I'll have them done before I hit "publish post." Honest.
What's left?
The fun stuff: the One Essential Task.
I thought it might be cleaning up the soffit now that the stenciling is done.

But no.
Then, the part for fixing the bathroom faucet was delivered. That came much more quickly than I'd expected. I thought I might get that done.

But no.
I suddenly remembered that I had purchased 2 bags of tulip bulbs yesterday-- 1/2 off. (Less than 24 hours in my possession and already I'd forgotten!) There had been another customer beside me when I'd been considering them and I'd asked her "What do you think, is it too late to plant them?"
"Not if you can dig a hole," she said.
I've always intended to have tulips encircle our flag pole. (We inherited it with the house.)

So, I marked out an encircling horseshoe with twigs and spray paint and felt very clever.
The ground was frozen.
Solid.
Daedalus (my husband, not his real name.) came and stood on the shovel. (I did too.)
But no.
So, I quickly changed my plans and decided to plant them in the boxes in the back yard. We amended two of them this year, so in order to leave the other two boxes free for working in next Spring that's where I decided to plant them.

Actually, I only got as far as planting one box (4'x 4') with one bag (28 tulips). The soil wasn't frozen solid--it was just frozen in big chunks. So, I did a lot of whacking with the shovel. Gardening at my house is not for wimps.

I also attached these house numbers to the boxes so we can keep track of them. (#1 & #3 were amended this year, an odd year, and #2 and 4 will be amended in even years. Of course, we came up with this genius plan after we'd already gone ahead and double dug the planting boxes: thus the weird order to the numbers.)
Now I've another reason to look forward to spring--and winter isn't even here yet.
Friday, May 13, 2011
Container Gardning Part 2
It all started with a trip to Home Despot to check out their sale on bathroom tile.
Honest it did.
They had racks and racks and racks of garden plants--just in! And I found an enthusiastic woman who was thrilled to help me assemble an assortment for my shady front yard. Here's what I got:

4 dracenea --for height.
2 fuchsia --bright pink with purple insides. My daughter wanted them.
2 osteospermum --the daisy-like things with dark purple centres. I love them.
2 potato vines-- just because.
2 calibrachoa --small, bright green with small purple flowers to hang down the sides of the pot.
But before I planted them into my pots, I needed to know where to position the pots.
Let's see. Here?
 rather underwhelming, don't you think?
I wanted the UP. I needed height, so I tracked down these old zinc washtubs I bought eons ago.
 just misses being symmetrical. hate that.
Hmm, what about here?

I liked it.
Actually, looking at it again, now, I love it! It hides the mess we made of the walk way when we tore it up a couple of years ago and the down spouts are less visible, too.
But I wasn't sure it didn't look sort of silly. So, I left things like that until hubby cam home. He laughed.
So, I went for the simple, the honest, the true: planters at the foot of the stairs.
I bought some potting soil. Thrifty Decor Chick told me to "look for the cheap" potting soil--so I did. It took a while, actually, but I found some stuff at $2.99 for a big bag. The next cheapest potting soil was $7.99 Quite the difference!
As I was putting together the planter, I followed another bit of Thrifty Decor Chicks bits of advice: turn pots the plants came in upside down inside the pot to take up some of that space! It also makes the pots themselves lighter and thus easier to move.

So, I planted away in 40 to 60 km/hour winds last night. (Ok, mostly 40.)
 This was my planting "station" set-up.
This morning, I had this:
 zero impact. taken at about 8:30am this morning.
and this:

Did I miss something? They just look like plants stuck in a pot to me.
Are there too many plants?
Have I put them in the wrong spots?
Do I need different pots?
Or is this just the way things look at the beginning?
I know you can help me.
Please?UPDATE: Really, the problem isn't my pots, is it? It's the fact that there are no plants in the front, there. I have been researching my options for shrubs in this shady spot. I've decided that mock orange--or philadelphus lewisii 'Blizzard" is a shrub that will work--and a local nursery has one! I'm so excited. Hopefully, I can purchase that tonight and get it into the ground tomorrow. I'd also like to try actaea racemosa or Bugbane on the west side of those steps.
Honest it did.
They had racks and racks and racks of garden plants--just in! And I found an enthusiastic woman who was thrilled to help me assemble an assortment for my shady front yard. Here's what I got:

4 dracenea --for height.
2 fuchsia --bright pink with purple insides. My daughter wanted them.
2 osteospermum --the daisy-like things with dark purple centres. I love them.
2 potato vines-- just because.
2 calibrachoa --small, bright green with small purple flowers to hang down the sides of the pot.
But before I planted them into my pots, I needed to know where to position the pots.
Let's see. Here?
 rather underwhelming, don't you think?
I wanted the UP. I needed height, so I tracked down these old zinc washtubs I bought eons ago.
 just misses being symmetrical. hate that.
Hmm, what about here?

I liked it.
Actually, looking at it again, now, I love it! It hides the mess we made of the walk way when we tore it up a couple of years ago and the down spouts are less visible, too.
But I wasn't sure it didn't look sort of silly. So, I left things like that until hubby cam home. He laughed.
So, I went for the simple, the honest, the true: planters at the foot of the stairs.
I bought some potting soil. Thrifty Decor Chick told me to "look for the cheap" potting soil--so I did. It took a while, actually, but I found some stuff at $2.99 for a big bag. The next cheapest potting soil was $7.99 Quite the difference!
As I was putting together the planter, I followed another bit of Thrifty Decor Chicks bits of advice: turn pots the plants came in upside down inside the pot to take up some of that space! It also makes the pots themselves lighter and thus easier to move.

So, I planted away in 40 to 60 km/hour winds last night. (Ok, mostly 40.)
 This was my planting "station" set-up.
This morning, I had this:
 zero impact. taken at about 8:30am this morning.
and this:

Did I miss something? They just look like plants stuck in a pot to me.
Are there too many plants?
Have I put them in the wrong spots?
Do I need different pots?
Or is this just the way things look at the beginning?
I know you can help me.
Please?UPDATE: Really, the problem isn't my pots, is it? It's the fact that there are no plants in the front, there. I have been researching my options for shrubs in this shady spot. I've decided that mock orange--or philadelphus lewisii 'Blizzard" is a shrub that will work--and a local nursery has one! I'm so excited. Hopefully, I can purchase that tonight and get it into the ground tomorrow. I'd also like to try actaea racemosa or Bugbane on the west side of those steps.
Tuesday, May 10, 2011
Container Gardening
Last fall, I purchased two containers to flank the front steps. I have no idea what to plant in them, of course.
BHG developed a short little quiz to help me figure it out.
This is what they came up with when at Question 6 I picked "modern" over "country."


I wish I had known not to buy the containers, first! They are nothing like either of these. Oh well.
And of course, I have absolutely no idea whether I can even get any of these plants here: or whether, if I started them from seed, they would even have time to grow.
BHG developed a short little quiz to help me figure it out.
This is what they came up with when at Question 6 I picked "modern" over "country."

A: Boxwood (Buxus 'Winter Gem') -- 1
B: Golden creeping Jenny (Lysimachia nummularia 'Aurea') -- 3
C: Dragon Wing Red Begonia -- 3
Here's what happened when I chose "Country" (and kept all other responses the same.)
A: Honeybush ( Melianthus major) -- 1
B: Licorice plant (Helichrysum petiolare 'Licorice Splash') -- 2
C: Variegated geranium (Pelargonium 'Dolly Vardon') -- 1
D: Variegated geranium (Pelargonium 'Crystal Palace Gem') -- 1
I wish I had known not to buy the containers, first! They are nothing like either of these. Oh well.
And of course, I have absolutely no idea whether I can even get any of these plants here: or whether, if I started them from seed, they would even have time to grow.
Thursday, March 24, 2011
Garden Planning
Sorry to have been incommunicado. I had an allergic reaction to something last Thursday night and I'm only just getting back on my feet.
In honour of spring, I thought I would let you know what I've got planned for the garden. It will be a while before I can actually get outside and do anything about these plans, however. (I haven't set things up to start seeds indoors.)
Here's what the garden looked like this afternoon:

Not a whole lot to work with, yet!
Here's a photo from last fall when we finally got all four planter boxes built:
 I didn't plant anything in the two front boxes. Those are weeds.
This is looking east. North is to the left of the picture.
Last year, I planted just two of these four foot by four foot boxes. This year, I have plans to plant all of them. I hope I'm not being too ambitious.
Box A: (NE Corner, upper left): onions, potatoes and nasturtiums.
Box B: (SE corner, next to the playhouse): spinach, beets, carrots and parsley.
Box C: (NW corner, bottom left): 2 zucchini plants and peas.
Box D: (SW corner, bottom right): 2 tomato plants and marigolds.
Like this:

I've had to juggle start dates like mad for our Zone 3 garden, but it looks as though I should be able to sow everything but the spinach, the marigolds, tomatoes and onions after our first frost free date which is in mid-May. (In fact, the May long weekend celebrating Queen Victoria's Birthday is known as the "Garden weekend" here.)
I'll purchase the marigolds, onions and tomatoes already started and plant them in mid to late April. Apparently, that would be a good time to sow the spinach seeds, too.
It's hard to be patient!
Any thoughts from experienced gardeners out there? Have I got too much in the SE box? Have I got some crops paired up which shouldn't be? Help and advice appreciated!
Added: I'm unable to comment, again. (sigh). I don't know what's going on. Building the planter boxes was easy: I had my husband read the instructions at the Pioneer Woman's Website which I've found again, here: Build your own raised beds..
In honour of spring, I thought I would let you know what I've got planned for the garden. It will be a while before I can actually get outside and do anything about these plans, however. (I haven't set things up to start seeds indoors.)
Here's what the garden looked like this afternoon:

Not a whole lot to work with, yet!
Here's a photo from last fall when we finally got all four planter boxes built:
 I didn't plant anything in the two front boxes. Those are weeds.
Last year, I planted just two of these four foot by four foot boxes. This year, I have plans to plant all of them. I hope I'm not being too ambitious.
Box A: (NE Corner, upper left): onions, potatoes and nasturtiums.
Box B: (SE corner, next to the playhouse): spinach, beets, carrots and parsley.
Box C: (NW corner, bottom left): 2 zucchini plants and peas.
Box D: (SW corner, bottom right): 2 tomato plants and marigolds.
Like this:

I've had to juggle start dates like mad for our Zone 3 garden, but it looks as though I should be able to sow everything but the spinach, the marigolds, tomatoes and onions after our first frost free date which is in mid-May. (In fact, the May long weekend celebrating Queen Victoria's Birthday is known as the "Garden weekend" here.)
I'll purchase the marigolds, onions and tomatoes already started and plant them in mid to late April. Apparently, that would be a good time to sow the spinach seeds, too.
It's hard to be patient!
Any thoughts from experienced gardeners out there? Have I got too much in the SE box? Have I got some crops paired up which shouldn't be? Help and advice appreciated!
Added: I'm unable to comment, again. (sigh). I don't know what's going on. Building the planter boxes was easy: I had my husband read the instructions at the Pioneer Woman's Website which I've found again, here: Build your own raised beds..
Monday, August 16, 2010
Bird Bath
I saw this idea on a blog somewhere out there. The blogger was actually much more clever than I: she used an old glass lampshade as the bowl with an old wire planter as the base.
If you know what project I'm referring to and you know who did it, please let me know and I'll link up to her post.
That was a truly clever interpretation of the idea: but not the first. The birdbath in this charming front yard was the first I saw.
 (I didn't keep track of where I got this image. If you know, please let me know so I can give credit.)
I reinterpreted the enamel bowl. But not by much:

I found a wonderful wire plant stand:

I bent out the top wire loops by hand and placed the enamel bowl into it.
Then, we put a rock in it to give the birds a perch and to weigh it down.

I has a certain je ne sais quois, don't you think? My husband calls it "Bird Brain in a Bowl"
What do you think? I'm soliciting opinions. Is it finished? Should I spray paint the black base white to tie it into the bowl? Should I paint the bowl? Both? Or just leave it, in all it's rustic "as is" glory? What do you think?)
For no other reason than I want to play with some new friends, I'm linking to Metamorphosis Monday at Between Naps on the Porch.

If you know what project I'm referring to and you know who did it, please let me know and I'll link up to her post.
That was a truly clever interpretation of the idea: but not the first. The birdbath in this charming front yard was the first I saw.
 (I didn't keep track of where I got this image. If you know, please let me know so I can give credit.)
I reinterpreted the enamel bowl. But not by much:

I found a wonderful wire plant stand:

I bent out the top wire loops by hand and placed the enamel bowl into it.
Then, we put a rock in it to give the birds a perch and to weigh it down.

I has a certain je ne sais quois, don't you think? My husband calls it "Bird Brain in a Bowl"
What do you think? I'm soliciting opinions. Is it finished? Should I spray paint the black base white to tie it into the bowl? Should I paint the bowl? Both? Or just leave it, in all it's rustic "as is" glory? What do you think?)
For no other reason than I want to play with some new friends, I'm linking to Metamorphosis Monday at Between Naps on the Porch.
Wednesday, August 13, 2008
Tomatoes
 Most of these were enjoyed in Aurelia's Birthday dinner salad.
Tomatoes symbolise the purpose of having a food garden. It was The End of Food by Thomas F. Pawlick, I believe, which explained the mystery and annoyance of the ubiquitous cardboard supermarket tomato.
I was never allowed to eat tomatoes in the winter: we couldn't afford them. If my mother did give in to my high pitched pleadings, I was invariably disappointed. They were tough, they tasted awful and the expensive booty was left to rot in the fridge.
In the summer, by contrast, we would slice a tomato each, layer it on two pieces of soft brown bread slathered with mayo, dust them with salt and devour them standing over the kitchen sink letting the juices fall down over our chin and harmlessly into the drain.
When was the last time you had a tomato like that?
Blame it on the Unions. Blame it on migratory workers wanting a living wage, for heaven's sake. Blame it on the big tomato producers who found a way to get rid of unionized decent-wage demanding migrant workers. Blame it on mechanical pickers which can only pick a tomato of a certain size and weight. Blame it on chemicals and transportation. Blame it on the discerning consumer.*
We are now in the odd situation where canned and processed tomatoes are actually healthier than the red, chemically ripened globes in the fresh produce aisle. The latter don't have to be "perfect", you see, so they are allowed to ripen a little longer, get a little bigger before they are picked by a mechanical arm.
So what's a chin slobbering fresh tomato-loving gal to do?
Grow my own.
I did it wrong, though.
What I did right:
I picked a good variety--"Early Girl." As we have a teeny tiny growing season, I wanted something that would actually ripen before September. Since I didn't give it any thought until late May, I bought two already started.
I planted them in "container soil" in a large tub.
I watered them faithfully, even through all the rain we had. One night as we noticed hail about to bounce from the sky, the husband and I picked up the tub and carried it inside the playhouse.
I mulched them with spent coffee grounds. I did this mostly to keep the dog away from them, but it turns out to have been a good thing.
I put a cage on them to support them.
What I did wrong:
I planted them side by side. They need two to three feet between them, or one tub each.
I put the cages on them: upside down.
I didn't fertilize.
I didn't prune.
Outstanding early variety of tomato for short season gardens. Proven, dependable, tasty uniform 4 to 5 ounce tomatoes. Excellent for home gardens (24 seeds approximately). Early Girl is an indeterminate variety (tall growing) so provide some support as plants grow. Approximately 62 days to maturity from transplanting.From Ed Hume's Seeds
"Indeterminate" varieties need to be staked and pruned. Basically, you find "one main leader," train it up a stake and snap off any "branches" which come out from the leader and head sideways. Trimming them out allows air and light into the plant and prevents all sorts of problems like mildew.
A "determinate" variety, on the other hand, should be let to sprawl on the ground and the suckers allowed to develop.
(And, of course, given my penchant for procrastination, I only found all this out this week.)
My first tomato was nice and large: big enough for a sandwich with some left over. I meant to eat it that way, but somehow it got tossed into a scrumptious salad. I couldn't believe my daughter when she refused it at supper.
"I don't want tomato," she said.
"You've ever had a tomato like this one," I said, "give it a try." (It killed me to say it, actually. I would have been quite happy eating it all myself.)
She protested some more, so finally, I said, "Just take a no-thank you bite. Here."
She actually thanked me later for making her try it. And she requested the same salad for her birthday dinner.
The tomatoes, since, though, have been quite small. Too small for a sandwich. I have hope, yet, though. Along with a bunch of little ones, there's one which looks quite promising still on the vine.
And I'm not going to share it.
*This line always trumpets through my head as I prowl through the produce: "Give me spots on my apples, but leave me the birds and the bees, pleeeeeeease." From Big Yellow Taxi by Joni Mitchell.
Monday, June 9, 2008
Monday's Ten Step Project.
I finally bit the bullet and planted one of my tomatoes.
(I didn't have enough soil for the second.)
Step One.
Agonize about the containers.
Step Two.
Stop worrying.
Step Three.
Put in rocks. The bag of "soil" said to put down gravel or pebbles. Too late.

Step Four.
Wrestle wheel barrow out of garage.
Step Five.
Moisten soil.
Step Six:
Put soil in container.

Step Seven.
Call daughter to help.
Step Eight:
Have helper hold plant in container while she mugs for the camera and put in more soil.

Step Nine.
Put coffee grounds down around the top to discourage the dog from eating the plant.
Step Ten
Water thoroughly and take final picture.

Let's hope it survives and gives us lots of juicy, sweet, large, ripe tomatoes.
(I didn't have enough soil for the second.)
Step One.
Agonize about the containers.
Step Two.
Stop worrying.
Step Three.
Put in rocks. The bag of "soil" said to put down gravel or pebbles. Too late.

Step Four.
Wrestle wheel barrow out of garage.
Step Five.
Moisten soil.
Step Six:
Put soil in container.

Step Seven.
Call daughter to help.
Step Eight:
Have helper hold plant in container while she mugs for the camera and put in more soil.

Step Nine.
Put coffee grounds down around the top to discourage the dog from eating the plant.
Step Ten
Water thoroughly and take final picture.

Let's hope it survives and gives us lots of juicy, sweet, large, ripe tomatoes.
Subscribe to:
Posts
(
Atom
)
