Pages

Friday, May 27, 2011

Bird Art

At last, I get to check something off on my grand summer project list.

This particular project started back when I was styling my Expedit. You remember this as one of my inspiration images?


I figured I could duplicate the look by gluing scrapbook paper to canvas. So, on one of my recent forays into Micheal's, I kept my eyes open. I got very lucky and found a package of two 12x12's canvases for $8.39.

But as I culled my scrapbook paper, I just didn't find any I wanted to use as a single sheet. Ok, I lie. I did find some: but I didn't have a whole sheet of it. Not only that, but I couldn't find two intact sheets I wanted to use together. And I most certainly did not want to walk into a scrapbook store to find any. I had to use what I had. But, just putting paper on canvas seemed sort of boring, in my house, on top of my Expedit.

One night, browsing the 'net, I found this project:

source: Cottage Hill

Not only did Lindy provide a great tutorial, (click on that link above for it) she also made a print out of the birds in outline available.

So, what else could I do? She made it too easy.

Here was her inspiration:

source: The Birds at Ballard Designs. They have so many amazing and beautiful things for the walls that I just linked to all their art work available.

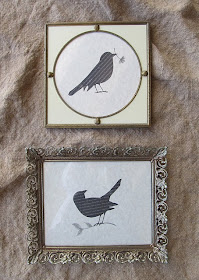
And here are mine.
(If you want to learn how I did it, keep reading. If you just want to ooh and aah, you can do that now.)

diy ballard bird art, bird art, diy bird art
Tutorial:

I sized the birds to fit my canvas (about 8" wide for a 12x12 canvas.) and printed them out. Then, I transferred Lindy's outline of the birds to the back of the paper I wanted to use using the highly sophisticated scribble method.


Then, I cut out the birds. (My daughter actually did one of the birds and I did the other. That's just how easy it was.)

I found a bunch of craft paint in the basement that wasn't completely dried up and had what I needed, fortunately, to mix the colour I wanted for the edges. I encountered the first big hurdle when I couldn't find the painter's tape.

There I was, with my lines carefully measured 1/2" from the outer edge, and drawn with a ruler--and no way to keep the line straight except my eagle eye and steady hand.

Bosh. I decided I needed to let go of my perfectionism and just get on with it. After all, art is not supposed to be perfect. In fact, you could say it is its imperfections which make it art. You could. But, I'm not going to press my point.

I also used the scribble method to transfer the design of the leaves and flower to the canvases, directly.

This is after going over it with the charcoal pencil. There's no way pencil would come out that dark.

Then I did a bad thing. Even given the whole let's not be perfect thing, I do have my limits.

I used a charcoal pencil to go over my HB pencil lines. Why was it a bad thing? Charcoal smudges, really, really well (you could say it was designed to do that!) as I quickly discovered when I went to erase a small mistake. (I said I wasn't going to press the point!)


That's not what I'd call crisp, exactly. The mere thought of more smudging was more than I could handle.

Oh dear. What was an art-phobic, can't draw-worth-a-damn girl supposed to do?

There was nothing else to be done.

I sighed and gallantly grabbed the next-to-finest brush I have and I put my tongue between my teeth and I painted on those lines. I did. I really did.

Then, I used mod podge to stick the paper to the canvas. (Use waxed paper underneath the item you are mod podging.) I carefully positioned it and pressed down the edges.


I made a sandwich to weigh it all down. A large book at the bottom for stability, waxed paper for protection, the canvas upside down, of course, another book placed inside the frame, a large book on top of that for stability, waxed paper, the canvas, another book. All weighted down, I waited.


As I was screwing the supports into the back of the canvas so that they'd stand up, I realised I was going the have to mod podge the fronts, too.

Hard to see, but I put small rubber pads on the bottom of the corner brackets so they won't scratch any surfaces.

The canvas was too vulnerable to dirt and dust and fingerprints to be left bare.

But it all worked out. They could do with another coat, but I'm calling it good for now and moving on.

styling expedit, diy bird art, bird art
I really need to do something about that ol' Grecian urn, now, don't I?

Linking to the 123rd Metamorphoses Monday.


Also linking to the Lettered Cottage, How To Tuesday.

The Lettered Cottage


Thanks so much for stopping by and do check out the other great projects.

Thursday, May 26, 2011

Simple Daybook Meme


Outside My Window...


I am thinking...
of food, exercise and weight, again.

I am thankful for...
the smell of lilacs

From the kitchen...


I am wearing...
the ugliest running shoes in the world

I am creating...
you'll have to wait and see...

I am going...
to an electronics store. Hubby says there's a sale.

I am reading...
The End of History and the Last Man, by Francis Fukuyama.

I am hoping...
to get the garden planted this weekend.
I am hearing...
the kids playing the new X-Box in the living room.

Around the house...
things are looking good, thanks to Flylady Bingo.

One of my favorite things...
silence.

A Few Plans For The Rest Of The Week:
starting the slipcover for the loveseat. Planting the garden. Making chocolate cheesecake brownies.
Here is picture thought I am sharing...
so ephemeral.

Tuesday, May 24, 2011

Let there be....

LIGHT! You guessed it.

It is a small change. Very small....but I'm so excited! I have been wanting under the cabinet lighting for so long! I've come home with all sorts of things, but nothing has really worked for me.

Until now.

Here is how my counter looks "usually." (Well, OK, not really, "usually". Usually there's a knife rack and a big basket of various breads and the pasta jar sitting here.)


Bonus. The light fixture has two settings!

Low:


and high:


Just too much excitement for less than $20.00.

Though my husband did tell me that the mounting screws which came with it snapped while he was trying to install it.


It's just begging to be styled, isn't it?

Saturday, May 21, 2011

Week 8: The Party. The Hybrid Plan

In this hybrid cure, none of us are holding a party. But the idea of a party is still useful--that is, you want to finish off any projects you have started and tidy and clean the place as if you are expecting guests. In fact, it would be fun to do a "before and after" post at the end of the week showing off what we've done.

So, what follows is a selective list of things to do this week from Maxwell Gillingham-Ryan's much larger list for Week 8 on p. 224 of Apartment Therapy, the Eight Step Home Cure.

Bones:
Vacuum the entire apartment and clean all the windows

Breath:
Do a final purge for clutter and empty the outbox

Heart:
Buy fresh flowers

Head:
Cook and eat at home
Plan the week at home.

*************
For me the focus this week will be on my Basement.
To put it mildly, it is an absolute disaster.

(Yep, that's the dreaded dungeon down there.)

So, in addition to working on my project list, I will be working in the basement (and the garden) this coming week. So, without further ado:

Spring Cleaning List:

Stairway
Wash stairs
Attach loose rubber matting
Wash treads
Wash wall

Storage Area
Discard old furniture
Set up Zones
Clean out dressers
Set up curtains for storage wall

Laundry Room
Clean dryer vent hose
Scrub out lint trap
Clean washer
Clean dryer
Set up something to organize bedding

Declutter Spots:
Baskets with sports equipment
Under the stairs
Tables by washer and dryer
Donation centre

PS: I would include pictures with this post but I cannot open my usual photo editing software. I'm have been trying to "fix" the problem, now, for several hours. I give up (for now).
Friday, May 20, 2011

Summer Project List


The list is long.

Too long.

(But not as long as that at Young House Love. Yeesh!)

At this point in every cure, all the plans that I have made--and the projects I expected myself to do--sit, mocking me. Some of them are still on the list from past cures. It really is time to do something about it!

Target date for completion: September 2011. I will post this post as a link in the sidebar and update this post as tasks become completed.

So, here is the list, in its entirety, arranged by room.

Living Room:

Install trim on wall above fireplace
(carried over to Winter Project List)

Sew curtain panels
purchased new instead. October.
Movin' and Shakin'


re-cover rocking chair cushion
(dropped from list)

paint Poang chair
(dropped from list)

find or create new artwork for gallery wall above Sofa.
(done. August)


put slipcover on couch
done! 06/03/11
A Small Thing

find and purchase new 8x10 rug
done! Found one on the curb, actually.
Inspiration: The Living Room


Dining Room:


Lengthen curtains
done! October 24th.
"New" Curtains

Create art
done May 28, 2011.
Bird Art


Kitchen:


paint upper cabinets white (BM Cloud White)
done! October

paint window trim white (BM Cloud White)
done! October


decide on paint colour for walls
(carried over to Winter Project List)

paint walls
(carried over)


Back Hallway:

scrape popcorn off of ceiling
(carried over)

paint walls BM Edgecomb Grey
(carried over)

Paint doors and trim BM Cloud White
(carried over)

Downstairs Bathroom:


remove old bath tub and shower surround
done! November 24, 2011
Tales from the Tub Surround

fix wall
done. November/December


find and purchase black decorative and finishing tile
(dropped from list.)

install tile
carried over

purchase new fixtures for sink
dropped from list. May not be necessary.

install new fixtures
(dropped from list)

Master Bedroom:

choose new paint colour
(carried over)

paint room
(carried over)

make headboard
bought a bed frame instead. 06/10/11
The Big Bed


recover loveseat
(dropped from list)


make new bedskirt
(dropped from list)

purchase new Duvet cover
(carried over)

create height for hubby's bedside table
(carried over)

paint our bed side tables
(dropped from list)

One thing I did do this week--TA DA! and before I even had a chance to put it on this list. It waited patiently all winter, too--

Can you tell?
Sorry about that nasty before shot.
Hmm. A shovel and a broom, though seasonal, may not be the best of decor at the front door!


Now, to get on a ladder and do the trim on that roof line.

Shudder.

Wednesday, May 18, 2011

Hybrid Cure: Bedroom Progress

When I came up the stairs with the camera in my hand this morning, this is what I saw when I looked through my bedroom door.


I actually haven't done all that much, but all of last week I was in the midst of sorting the clothes from winter to summer.


Now that that's done and everything is packed away, it feels like there's been a great improvement!

The clothes were all over this little loveseat. Unfortunately, you can see my storage boxes underneath it.

I have vacuumed the floor and dusted and washed the surfaces. I have vacuumed the lampshades and the window screen.


I vacuumed the box spring and mattress, and flipped the mattress. I changed out the bedding from its winter covering of sheets and a duvet to its summer attire of sheets, a blanket and my Matelasse quilt I've had for years and years.

The quilt at the foot of the bed was made by my great grandmother. It is beginning to get quite fragile. I may not leave it out.


And there we have it.

Left to do:
1) Wash walls
2) Wash the floor
3) Clean out the closet (maybe)
4) Tidy and declutter the linen closet
5) Plan the changes I want to make in this room. There's quite a few. Stay tuned for that post.

Sunday, May 15, 2011

Hybrid Cure Week 7: The Bedroom


*The "e" key on my keyboard isn't working too well. Please forgive me if I don't catch a dropped "e" here and there!

vacuuming the box spring before I flip the mattress.

I am very anxious for bedroom week to begin. On Friday, I vacuumed my bedroom and my son's room. I also vacuumed and flipped his mattress, changed the mattress pad and washed all his bedding--including the pillows. It felt so good to get it done!

I'm probably going to spend most of my energy giving the same treatment to my daughter's room (Monday) and my own. I also will be focusing on purchasing the tile we need for the bathroom project and seeing about getting a hole in a wall in the bathroom fixed. After that, I want to concentrate on the garden this week. So, I'm not like to do a whole lot on Maxwell's list.

source: Cote de Texas

On p. 208 of Apartment Therapy, the Eight Step Home Cur, MG-R would have us do this:

Bones:
Clean the bedroom and related storage
Buy an air filter for your bedroom.
Buy new sheets, pad, or mattress as needed.

Breath:
Declutter the bedroom.
Arrange the bed against the best wall.

Heart:

Makes sure your bedroom inspires you.


Head:
Look into ways to improve your sleep.
Optional: Outfit your bed to reduce allergens.

source: Pottery Barn. I love the colours in this quilt.


The Spring Cleaning List:


Wash walls
Dust furniture
Wash floor
Dry clean duvet
Wash pillows
Rotate mattress
Wash mattress pads, bed skirt and duvet cover
Wash heavy winter blankets and store

source: our suburban cottage I always think of this image as the "doable," budget version of the version by Joanie at Cote de Texas above.

Declutter spots:

the clothes closet
Change out winter clothes for summer
Inventory Sheets and pillowcases and discard what isn't needed.
I've heard it recommended that you should have three sets per bed including the guest bed.
Organize the linen cupboard

Sarah Richardson via HGTV

What will you be doing this week?

Friday, May 13, 2011

Container Gardning Part 2

It all started with a trip to Home Despot to check out their sale on bathroom tile.

Honest it did.

They had racks and racks and racks of garden plants--just in! And I found an enthusiastic woman who was thrilled to help me assemble an assortment for my shady front yard. Here's what I got:


4 dracenea --for height.
2 fuchsia --bright pink with purple insides. My daughter wanted them.
2 osteospermum --the daisy-like things with dark purple centres. I love them.
2 potato vines-- just because.
2 calibrachoa --small, bright green with small purple flowers to hang down the sides of the pot.

But before I planted them into my pots, I needed to know where to position the pots.

Let's see. Here?

rather underwhelming, don't you think?

I wanted the UP. I needed height, so I tracked down these old zinc washtubs I bought eons ago.

just misses being symmetrical. hate that.

Hmm, what about here?


I liked it.

Actually, looking at it again, now, I love it! It hides the mess we made of the walk way when we tore it up a couple of years ago and the down spouts are less visible, too.

But I wasn't sure it didn't look sort of silly. So, I left things like that until hubby cam home. He laughed.

So, I went for the simple, the honest, the true: planters at the foot of the stairs.

I bought some potting soil. Thrifty Decor Chick told me to "look for the cheap" potting soil--so I did. It took a while, actually, but I found some stuff at $2.99 for a big bag. The next cheapest potting soil was $7.99 Quite the difference!

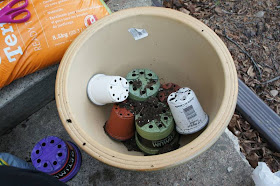
As I was putting together the planter, I followed another bit of Thrifty Decor Chicks bits of advice: turn pots the plants came in upside down inside the pot to take up some of that space! It also makes the pots themselves lighter and thus easier to move.


So, I planted away in 40 to 60 km/hour winds last night. (Ok, mostly 40.)

This was my planting "station" set-up.

This morning, I had this:

zero impact. taken at about 8:30am this morning.

and this:


Did I miss something? They just look like plants stuck in a pot to me.

Are there too many plants?
Have I put them in the wrong spots?
Do I need different pots?
Or is this just the way things look at the beginning?

I know you can help me.

Please?UPDATE: Really, the problem isn't my pots, is it? It's the fact that there are no plants in the front, there. I have been researching my options for shrubs in this shady spot. I've decided that mock orange--or philadelphus lewisii 'Blizzard" is a shrub that will work--and a local nursery has one! I'm so excited. Hopefully, I can purchase that tonight and get it into the ground tomorrow. I'd also like to try actaea racemosa or Bugbane on the west side of those steps.