is generally pink.
Unfortunately, in the case of this ten year old girl, it is also a mess.
She starts school in less than a week. Public school. Except for a brief jaunt in Kindergarten, she has been homeschooled until now. I am having separation anxiety: and one of the ways I know how to cope with anxiety is to be physically active.
And this room needs some action!
It faces West. These pictures were taken in the morning: I apologise for their poor quality. I just can;t get decent pictures of this room, ever, and the CF's in her light fixture do not help!
I'm not going to embarrass us both by posting pictures of the entire room. This should give you enough of an idea of the state it is in:
She want blue, purple and pink--she does not want me to edit her belongings (tough luck, sweetie) and she does not want me to paint her bookshelves white. She just may not get her way. This was the closest image a PB we could find which expressed her wishes as far as colour goes:
(She especially liked the TV! She's not going to get that either, poor kid!)
My Mom is going to come over today and help me empty out her room.
I also picked up this old desk from my Mom for my daughter last night.
Yep.
It is in rough shape (but I do have all the drawers and the piece is solid.)
Bisy.
Bakson.
(promise)
Pages
▼
Thursday, August 26, 2010
Monday, August 23, 2010
Pottery Barn Inspired Bathroom Curtain
I have an entry!
For what?
The CSI Project, of course. I discovered it on August 15th: and decided to enter this week's challenge: to create something inspired by Pottery Barn. Of course, I thought I'd re-do the powder room upstairs. The Pottery Barn Inspired Powder Room sounds wonderful, doesn't it?
Alas. It cannot be. I almost got it done. But not quite. It's looking awesome, though! You can read about it and see the projects in this post, if you'd like to see a marvelous makeover (in progress. Sort of.)
But I did sew a curtain. A gorgeous ruffled confection based on this one:
from the Pottery Barn Early Fall 2010, Bed and Bath Catalogue.
I did not have a curtain on this window in our powder room upstairs.
(No, the towel does not count!)
You should know that other than curtains, I do not sew. For every finished seam, there is one I have ripped out. This was an ambitious project for me, to say the least. But I was undaunted. I'd never made ruffles--how hard could they be?--and so off I went. What's that saying about fools rushing or something?
On Monday, I ran to the fabric store and found one fabric for the curtain and one for the ruffle. (I didn't realise until much later that the ruffles are made from the same fabric as the curtain. Oh well.)
I ran to the paint store and found the paint that best coordinated with it. Then, I went to many, many stores to figure out whether the colours I had chosen would work with available accessories. When I found the spray paint I needed at Canadian Tire, I declared the project doable, and the next day, Tuesday, I bought my fabric.
Wednesday, I washed it.
And then it sat and waited while I painted.
And painted.
Saturday, realising the CSI project was coming up quickly, I got to work.
1) Untangle the fabric.
2) Iron it.
3) Make the bias strip for the ruffles. I got 11 feet from this 16" x 16" square of fabric.
Indeed I did. I will post a tutorial later this week. (I followed instructions from a book).
But I quickly realised I'd skimped on the width. I'd cut the strip only 1 3/4" wide--somehow I'd totally forgotten about making seams!
I went to bed.
Sunday afternoon, I made two hems: one for each raw edge.
(It would have been really cool if my mother's handkerchief hemmer foot had worked on my machine, but it didn't--even though we both have Kenmore's. She bought hers the year I was born, and I bought mine in 1989, but still!)
After doing the hems, but before I began to sew the thread for the ruffle, I cut the 11 foot strip into two equal pieces. Sewing a hem on either side of the strip, though tedious and time consuming, did give me an advantage. I only had to sew--and therefore pull--through only one thickness of fabric to make the ruffle. That was a very good thing!
(This is about how things looked late Sunday night.)
Essentially, I loosened my tension and lengthened my stitch. I'd discussed how to do this at length with a good woman at the fabric store. As you can see, I sewed it right side down. When I was done, I realised I'd forgotten to take her advice sew my top thread in one colour and bobbin thread in another. Oh well. I put a square of tape on the pull threads.
Gathering the ruffle is not a job for a perfectionist. I probably spent an hour or so, Monday morning, getting it all smoothed and laid out. When the time came to attach the second ruffle, I had my method figured out.
Pull and flatten the ends. Pin the ruffle at each outside edge of the curtain.
(Not like this. See that second pin? Fugeddaboutit. You aren't ready for it, yet!)
No, no, pin the ruffle in the middle of the curtain. Then work the ruffles out on either side. Pin, pin, pin. Then sew. Carefully. Use both hands to hold the sides of the ruffle as you feed it through. It took some time, but I got it done.
Yay!!
Then I hung it.
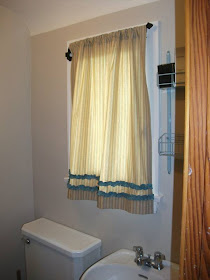
Too long.
I had to think about it. There was no way I was undoing that hem and those ruffles---and then it occurred to me--refold the top!
Well, hello!
And so it was done.
Shall we see that again?
Ta da!
Please take a look at the other awesome entries here:
There's sure to be some amazing projects.
I'm also linking to
Pottery Barn Inspired Bathroom...a.l.m.o.s.t. t.h.e.r.e.....
Ugh. I really, really wanted to enter the entire bathroom makeover to the CSI Projects contest, but I'm not quite done.
The new shelves aren't finished and the glass place will take three weeks to finish re-mounting our broken mirror and making a glass shelf. But, other than that, since last Sunday night, when I came up with the hair-brained idea of trying to pull off a Pottery Barn Inspired Powder Room in one week, I have done the following:
1) Painted the entire room based on the colours in the Pottery Barn Bed and Bath Catalogue. You can read how that came together in this post.
2) Spray painted the hanging basket:
(accessorized it better, too!)
3) Spray painted the old Ikea spice rack:
4) Spray painted the light fixture (from white to black):
5) Purchased and installed a new toilet roll holder:
6) Purchased and installed a new light switch and switch plate cover:
7) Gave the poor old toilet a makeover:
(Essentially, I spray painted the tank lid and hubby installed a new seat. Yes, there's a story. Maybe someday I'll tell it.)
8) And, I sewed a curtain for the window.
That story I did enter into the CSI Projects contest!)
Not bad for a week's work!
Saturday, August 21, 2010
Progress Report
Hooray!
There has been progress.
Wonderful, heartlifting, joyous, transforming progress. I have not been this excited and happy about a project since I don't know when!
Here is my tiny bathroom, taken from the hallway, on Thursday:
and here is what greeted me this morning:
I am so thrilled! That's unusual for me, actually. Usually, right after I paint, I don't like the colour. I think I react negatively to the change, or something. By the time I have the room back together, the colour has grown on me and I'm once again happy with the choice that took weeks and weeks to make.
This was totally different. I just sat down and browsed the PB on-line catalogue for inspiration--and when I was done, I noticed that PB and my favourite paint people have collaborated. The colour of the rooms in the catalogue are all listed in Benjamin Moore colours!
For example, here is an image from the Bed and Bath Catalogue, page 14-15.
And on this page, we have a listing of the colours used.
I was thrilled. In my mad dash to find PB- inspired fabric and accessories on Monday, I found the fabric, got swatches, and then went to BM and picked up three possible paint chips: Manchester Tan, Rattan and Hush. After I was finished my running around on Monday, I knew the project was doable. On Tuesday, I bought Hush.
I didn't even take the paint chip upstairs to the bathroom. It is a south facing room. Anything would work, as long as it wasn't too light. Manchester Tan was too light. Rattan, too dark. The decision was simple.
Though, I must admit I did laugh at myself when Daniel McGinn, discussing a Realtor's staging of a house for sale, wrote this:
Why wouldn't I want to buy my own house?
(taken with the flash)
Yum.
Meanwhile, work in the kitchen continues:
There has been progress.
Wonderful, heartlifting, joyous, transforming progress. I have not been this excited and happy about a project since I don't know when!
Here is my tiny bathroom, taken from the hallway, on Thursday:
and here is what greeted me this morning:
I am so thrilled! That's unusual for me, actually. Usually, right after I paint, I don't like the colour. I think I react negatively to the change, or something. By the time I have the room back together, the colour has grown on me and I'm once again happy with the choice that took weeks and weeks to make.
This was totally different. I just sat down and browsed the PB on-line catalogue for inspiration--and when I was done, I noticed that PB and my favourite paint people have collaborated. The colour of the rooms in the catalogue are all listed in Benjamin Moore colours!
For example, here is an image from the Bed and Bath Catalogue, page 14-15.
And on this page, we have a listing of the colours used.
I was thrilled. In my mad dash to find PB- inspired fabric and accessories on Monday, I found the fabric, got swatches, and then went to BM and picked up three possible paint chips: Manchester Tan, Rattan and Hush. After I was finished my running around on Monday, I knew the project was doable. On Tuesday, I bought Hush.
I didn't even take the paint chip upstairs to the bathroom. It is a south facing room. Anything would work, as long as it wasn't too light. Manchester Tan was too light. Rattan, too dark. The decision was simple.
Though, I must admit I did laugh at myself when Daniel McGinn, discussing a Realtor's staging of a house for sale, wrote this:
She'll [the Realtor] paint the walls an inoffensive beige. (One agent tells me the basic goal of staging is to make every room look like a page from the Pottery Barn catalog.) House Lust, p. 201
Why wouldn't I want to buy my own house?
(taken with the flash)
Yum.
Meanwhile, work in the kitchen continues:
Thursday, August 19, 2010
Tales from the Bathroom
What do you call it when you take something that has been carelessly handled and "destressed," clean it up (but not too clean!) and then enjoy it and use it in all its "olden" glory?
For that's what I have done. I'm in the middle of the Big Bathroom Project (the project is big, not the bathroom!) and I finally did one of those little niggling tasks that has been on the "to do" list, for, oh, ten years!
What on earth would be so horrible and icky and awful that I would procrastinate that long?
This.
I took a metal spatula (the kind you generally use to apply spackle with) and just chipped away at it. I was quite pleased with the way it turned out.
So pleased, in fact, I tackled the really nasty job I've been avoiding forever. Yes, the painted toilet.
The question, people, is why? Why would anyone paint the toilet? It looks somewhat more deliberate than accidental, don't you think? There was more, lots more, once upon a time. But it has been slowly peeling off over the years as I washed it.
It was time to get rid of the rest of it. Using the the miracle microfiber cleaning cloth, a little soap and lots of elbow grease (including the ever-so-useful handy tool--the good ol' edge of a fingernail), I did this:
Ta da!
(I will be able to get that last bit when my sweetie takes the bolt off to remove the toilet so we can replace this horrible, icky, awful floor.)
Getting that close to my toilet, though, had an unexpected bonus. I saw this:
I looked it up, of course. There was a Johnson Brothers (Hanley) Ltd. in Stroke on Trent. It was founded in 1896. They did make Toilets (or Sanitary ware) at the Trent Factory. (They also made pottery.) Here is the web listing.
A more interesting question may be perhaps, not why did someone try to paint an old toilet, but rather why do we have an old toilet at all? from England?
The tank lid even has a date: 1933. Say, what?
Our house was built in 1949 (as far as we can tell) and it's in a city, on the prairie, in, ahem, Canada.
Strange.
I'm linking to Frugal Friday at
Thanks for having the party!
For that's what I have done. I'm in the middle of the Big Bathroom Project (the project is big, not the bathroom!) and I finally did one of those little niggling tasks that has been on the "to do" list, for, oh, ten years!
What on earth would be so horrible and icky and awful that I would procrastinate that long?
This.
I took a metal spatula (the kind you generally use to apply spackle with) and just chipped away at it. I was quite pleased with the way it turned out.
So pleased, in fact, I tackled the really nasty job I've been avoiding forever. Yes, the painted toilet.
The question, people, is why? Why would anyone paint the toilet? It looks somewhat more deliberate than accidental, don't you think? There was more, lots more, once upon a time. But it has been slowly peeling off over the years as I washed it.
It was time to get rid of the rest of it. Using the the miracle microfiber cleaning cloth, a little soap and lots of elbow grease (including the ever-so-useful handy tool--the good ol' edge of a fingernail), I did this:
Ta da!
(I will be able to get that last bit when my sweetie takes the bolt off to remove the toilet so we can replace this horrible, icky, awful floor.)
Getting that close to my toilet, though, had an unexpected bonus. I saw this:
I looked it up, of course. There was a Johnson Brothers (Hanley) Ltd. in Stroke on Trent. It was founded in 1896. They did make Toilets (or Sanitary ware) at the Trent Factory. (They also made pottery.) Here is the web listing.
A more interesting question may be perhaps, not why did someone try to paint an old toilet, but rather why do we have an old toilet at all? from England?
The tank lid even has a date: 1933. Say, what?
Our house was built in 1949 (as far as we can tell) and it's in a city, on the prairie, in, ahem, Canada.
Strange.
I'm linking to Frugal Friday at
Thanks for having the party!
Wednesday, August 18, 2010
Another Big Project
First things first:
Thank you all for your lovely comments on my birdbath! I am on the lookout for a greyer rock. I'm glad you liked it.
Well, the kitchen re-do is stalled.
I worked, honest, I did. But there was a birthday party to prepare for and host and then two days of rain. It got sunny again for a day, and then, more rain.
So we've come to a screeching halt for a bit.
BUT.
I am painting.
Lots.
Over at The CSI Project next week there's a party for "Pottery Barn Inspired" projects.
When I read that, I thought two things at once: I wonder what PB is up to these days? and what am I going to do with that upstairs powder room? (It's the second one in the post.)
So I went and had a look-see and found this:
Purdy.
(So this is why I'm seeing ruffles in unusual places all over the place!)
And I thought two things at once.
Hmmm. this window needs, um, something (other than a towel).
and, I can do this. (The fabric is in the wash as we speak.)
I'm not stopping there, of course. Oh no. Why be sane? Here are my inspiration images.
(Actually, after posting, I realised that my images reflect a certain schizophrenia in my taste. So, I went back to the "drawing board" and pulled out only those I really, really liked. I tend to resist specifying my tastse, exactly. I feel as if it narrows my options. We have no PB here. In any event, these are they:)
Nuts--and yet, so much fun.
Monday, August 16, 2010
Bird Bath
I saw this idea on a blog somewhere out there. The blogger was actually much more clever than I: she used an old glass lampshade as the bowl with an old wire planter as the base.
If you know what project I'm referring to and you know who did it, please let me know and I'll link up to her post.
That was a truly clever interpretation of the idea: but not the first. The birdbath in this charming front yard was the first I saw.
(I didn't keep track of where I got this image. If you know, please let me know so I can give credit.)
I reinterpreted the enamel bowl. But not by much:
I found a wonderful wire plant stand:
I bent out the top wire loops by hand and placed the enamel bowl into it.
Then, we put a rock in it to give the birds a perch and to weigh it down.
I has a certain je ne sais quois, don't you think? My husband calls it "Bird Brain in a Bowl"
What do you think? I'm soliciting opinions. Is it finished? Should I spray paint the black base white to tie it into the bowl? Should I paint the bowl? Both? Or just leave it, in all it's rustic "as is" glory? What do you think?)
For no other reason than I want to play with some new friends, I'm linking to Metamorphosis Monday at Between Naps on the Porch.
Sunday, August 15, 2010
Inspiration and the Bug
from Vintage Sassy
I have been spending too much time these days surfing the web. Somehow, I stumbled across a "family" of blog sites whose members egg each other on to decorate, find vintage treasures and do endless clever DIY projects. They also have these "link parties" where folks can show off their creations or decorations or finds or what have you. I makes for many hours at the computer looking at real rooms by really talented women.
It all started with this blog: Vintage Sassy, now called "Storybook Cottage." LeAnn Huntington changes her decor faster than you can say either name so it's always interesting to see what has happened to her space! More than that, as I sat and read through her entire blog over a few evenings, I realised it was a story of a woman who found her inner decorating voice, her courage--and her joy. Her rooms were the vehicle for and the evidence of her transformation.
For example, here's the living room, as it looked in February of this year:
It kind of reminds me of another living room I know well (though hardly equal):
(all decked out for Aurelia's 10th Birthday Party.)
The living room over at LeAnn's transformed into something still tasteful, still gorgeous: but, oh, so much more alive! (The first picture above.) Of all the blogs I've been traveling, ( and believe me there have been a lot!) this one has inspired me to the most to go on the journey myself.
I have the bug. The decorating bug. The "let's hop into the car and go to Value Village and see if there's anything there" bug. I'm supposed to be de-cluttering, not adding to it! Oh well.
Here's a recently found treasure:
So what's going to happen now?
I have no idea.
I do have some painting to to this afternoon, though.
I have been spending too much time these days surfing the web. Somehow, I stumbled across a "family" of blog sites whose members egg each other on to decorate, find vintage treasures and do endless clever DIY projects. They also have these "link parties" where folks can show off their creations or decorations or finds or what have you. I makes for many hours at the computer looking at real rooms by really talented women.
It all started with this blog: Vintage Sassy, now called "Storybook Cottage." LeAnn Huntington changes her decor faster than you can say either name so it's always interesting to see what has happened to her space! More than that, as I sat and read through her entire blog over a few evenings, I realised it was a story of a woman who found her inner decorating voice, her courage--and her joy. Her rooms were the vehicle for and the evidence of her transformation.
For example, here's the living room, as it looked in February of this year:
It kind of reminds me of another living room I know well (though hardly equal):
(all decked out for Aurelia's 10th Birthday Party.)
The living room over at LeAnn's transformed into something still tasteful, still gorgeous: but, oh, so much more alive! (The first picture above.) Of all the blogs I've been traveling, ( and believe me there have been a lot!) this one has inspired me to the most to go on the journey myself.
I have the bug. The decorating bug. The "let's hop into the car and go to Value Village and see if there's anything there" bug. I'm supposed to be de-cluttering, not adding to it! Oh well.
Here's a recently found treasure:
So what's going to happen now?
I have no idea.
I do have some painting to to this afternoon, though.
Tuesday, August 10, 2010
Busy for a bit.
Hint.
Here's the inspiration:
(from House of Turquoise)
Here's the before:
No, I'm not telling.
You have to wait.
Here's the inspiration:
(from House of Turquoise)
Here's the before:
No, I'm not telling.
You have to wait.