Friday, May 31, 2013

Project 27: The Small Drawers.

This one came about because I organized the top drawer of the white dresser.


These are the cards we use for card games, Uno, Skipbo and your generic decks, in both bridge and poker sizes. There are cribbage boards, too, of course (though we still need to teach the kids to play crib). These used to be the main items we kept in the top drawer of the white dresser. But we don't need them there any more.

I like to call this part of the organizing process the "shuffle" because essentially, all you're doing is shuffling your stuff around. But it isn't always a simple thing to do--especially when you are dealing with a very disorganized home. The organized people tell you to take those items to their new home and leave them there until you're ready to organize them. I think this is a good strategy in a situation like this where you're working on a small scale. And I was lucky I already had something to put them in.

But so often, especially when I am organizing with my Mom, the new stuff to be moved in has to mingle with old, not-yet-decluttered stuff and the inevitable chaos that ensues is immense, especially when you consider that this is happening all over the house.


Things sat like this in the living room for a very long time.

One of the reasons I kept putting off this easy project was that this is one of the last bits left over from homeschooling.


Things have gone well, though. One of my son's teachers told me that "whatever" I'd done, I must have "done it right" because my son was able to "get what he needed" in order to learn the material.


I am grateful to that teacher.


So, there was absolutely zero emotional charge to re-purposing this handy little drawer unit.


One of the things Aby taught in her Organizing Fundamentals course is that one likely needs to re-organize whenever there's a major change in one's life. As I have been dealing with closing the homeschooling chapter of our lives, I am grateful I am dealing with the stuff now, instead of years from now. It's a great feeling to be creating a house we can live in now, instead of living in a home full of stuff I'm afraid to face.


I'm linking to Jules at Pancakes and French Fries for the William Morris Project, because that's what this was, even though it's late.

Monday, May 27, 2013

Apologies

Some sort of stomach virus or something has taken me over. I haven't been able to do much of anything at all. Pain is a jealous master.

Saturday, May 25, 2013

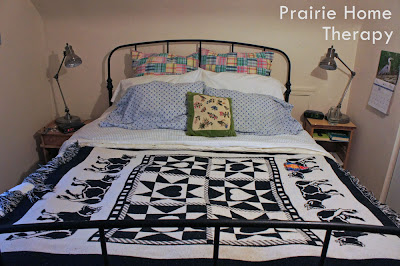
Project 25: Mend the Cow Blanket


This one certainly qualifies as an Anti-Procrastination Project.

I have put this one off for more than five years. I know it's been at least five years, because we got our new Beagle puppy about three days before my nephew was born on Christmas Eve. My nephew turned five last Christmas Eve.

The puppy did what puppies do: he chewed through everything.

Back sometime in the late eighties, or early nineties, I got this blanket on a trip to New Orleans with a boyfriend I had just broken up with. (Have you ever done that? Go on a vacation you've planned and paid for with someone you broke up with?) I think he may have thought it was a trial separation. I knew I would never sleep with him under that blanket, so I bought it. Plus, it was in a restaurant, and I'd never been in a restaurant that sold home décor before (or since).

Plus, it was cool.

The blanket is woven and has a design on both sides, each the reverse of the other. A classmate in my Organizing Fundamentals course alerted me to the fact that this meant it would be best if I mended the blanket from both sides.

The procedure to fix it was essentially this.

Buy a new iron. Buy a new iron and ironing board holder. Buy another iron. Oh wait, that was this anti-procrastination project! Just goes to show, everything is related.

Sorry, back to mending the hole.


1. Trim loose threads and tidy up the hole.
2. Take a lint roller and remove as much dog hair and other debris as possible which has accumulated for five years around the hole.

3. Stitch around the hole on the sewing machine to prevent further unravelling.


4. Get some really outrageous fabric to cover the "patch." Choose a shape which is sympathetic to the blanket.


5. Cut out two.
6. Hem the raw edges of the patches.


(NB: I should have used a zig zag stitch here and not a straight stitch.)

I was so nervous about ironing on the iron-on material that I procrastinated these next steps for a full week.

7. Find some sort of flexible woven stuff to iron on. Cut out two patches slightly smaller than the fabric patches.

 
I trimmed this to get this:


8. Iron it onto the blanket. At the last minute I thought to put down a piece of paper underneath the hole. I didn't want the iron-on material to stick to the ironing board cover!


I'm glad I did, because it did stick to the paper--but lightly. It was easy to peel off.

9. Then, carefully stitch the patch to the patch. (Again, use a zig zag. Embrace the zig zagginess. Much better than curling edges which is what actually happened after I washed it.)


Repeat steps 8 and 9 for the other side.


Wash the blanket--for the first time in five years--and display proudly.


I am so glad that's done.
(Except for the zig zag. I have to go back and re-do that.)

Friday, May 24, 2013

Project 24: Hang the Measuring Spoons

It's like a family that grew too big for its house.


These are my measuring spoons all in one basket in my "baking" drawer. It looks organized. It really isn't. Try finding 1/2 teaspoon in a hurry.

I saw this a long, long time ago, on Pinterest.

 
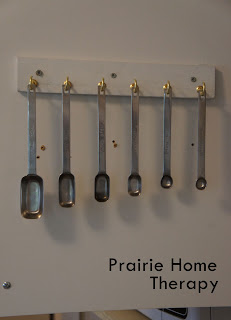
When my husband bought me these snazzy measuring spoons at Christmas, I asked him to make me something to hang them up.


Originally we were going to put them on the door of the cupboard which holds all my baking stuff.
 
 
Since the door here is solid wood, a few small screws would hold up the wood just fine.


My husband got this far in the project when I asked him if he was going to paint it. Um, no, he hadn't considered that. So, I told him to leave it with me and I would look after it.
 
ahem.
 
While I procrastinated, I realised I'm not doing a lot of baking anymore--but I am doing a lot of cooking with spices. I decided to move them over to the cabinet over the stove. So, I did, even though the thermo foil door here made me very nervous.


The first time, I put them in the wrong place. I didn't take into consideration how far they would stick out from the door. When I "tested" their placement, I just held the spoon against the door. With the handle of the measuring spoon flush with the door there wasn't any problem. But, once they were on the hooks, they extend 3/4 of an inch (or about 2 cm) from the door and the door wouldn't close. So, I drilled everything again and hung them higher.


I covered up my mistakes with contact paper--not just because it looks nicer, but to protect it. I've learned from bitter experience that once that laminated seal over the pressboard (or whatever it is) is broken, that pressboard just wants to expand whenever it gets wet. Paint won't stick to either surface without an excellent primer, so contact paper seemed the best choice for an area that only needs light cleaning. Then again, it is above the stove and it does get steamed a lot. I hope I haven't ruined the cabinet door.


I didn't label it though I wanted to. I can't figure out how to do fractions (or even how to make a space between characters)!  But it doesn't matter. I'll be shocked if the measuring spoons even make it to the door instead of in the drawer where their brothers and sisters are still hanging out.


At the end of the month, I'll be making a list of all the projects I've done during May's Anti-procrastination Project.


Thursday, May 23, 2013

Project 23: Plan the Vegetable Garden


When we first built our vegetable beds, I bought two very useful resources; a book, Guide to Canadian Vegetable Gardening,* by Douglas Green,  and a special edition of Mother Earth News magazine.


The magazine had an article on crop rotation. In that article, it grouped the vegetables by family. I'd never seen anything like it.

These are the family groups:

A. Onion family: onion, garlic, leeks and shallots
B. Carrot family: carrots, celery, parsley and parsnips
C. Sunflower family: lettuce, sunflowers, and a few other leafy greens
D. Cabbage family: cabbage, broccoli, Brussels sprouts, kale and many other leafy greens as well as rutabagas and kohlrabi
E. Spinach family; beets and chard
F. Cucumber family, cucumbers, melons, squash and gourds
G. Pea family: peas and beans
H. Grass family: corn, wheat, oats and rye
I. Tomato family: tomatoes, eggplant, peppers and potatoes (though I have a not never toplant tomatoes with potatoes. I don't remember why.)

So, planning our vegetable beds was a simple matter of figuring out what we want to grow this year and making a list.


Next, I grouped the seeds into the families above. They are very helpful for planting in beds. I allot one bed per family.

Then, I consulted the crop rotation diagram I made in 2011 and figured out where to put my vegetables and I made up a new chart for this year.
 

This is what I gave my husband when he asked me where I wanted things planted.


While I was having fun doing the planning, my husband and son dug out the odd numbered beds (as it is an odd numbered year) and amended them with compost. We should have added peat moss, but we were lazy this year.


So, almost on schedule, we planted the vegetable beds. (Of course, by "we" I mean my husband.) I suppose it doesn't matter that much if the planning is late--as long as the planting isn't! In case some of you think this is late, we live in climate zone 3a. The traditional date for planting here is the May long weekend (around Queen Victoria's Birthday) which we just had.


We're in the midst of a bit of  drought at the moment, so here's hoping all goes well. Linking to Jules at Pancakes and French Fries for the wonderful William Morris Project.

*This post does not contain affiliate links.

Wednesday, May 22, 2013

Project 22: The Frog

Are you familiar with the concept of Eating the Frog?

Brian Tracy borrowed the phrase to humourously encourage us to do the most unpleasant thing in our day, first. Everything after that, you see, would be a piece of cake. (So to speak.)

Here's a short video I found on you tube which explains it: http://youtu.be/0W7GB5Fh2XM

This project was my frog.

This dresser which we call the "white dresser" (and I do suspect he's related to the white rabbit as it is always getting away from me....) sits in a very busy spot.


The top of it is a clutter magnet. The top drawer is worse. It was the drop spot for everything I didn't know what to do with. What is this bit? Don't know, put it in the top drawer of the white dresser. Looking for something? Look in the top drawer of the white dresser. That works--to a point. But then it gets to where the drawer is so full, you can't find anything in there. It took us about two and a half years to get to this point. (I know, because I did a scrapbook page about clearing it out in 2010.)

The date on this picture is April 28th.


Tackling it was one of the reasons I started this project. (Why I have to start 30 in order to finish one, only my therapist knows--if I had a therapist--which I don't. But s/he'd know. I hope.)

I piled everything on top of the dresser, in hope that that would motivate me to tackle it.


Nope.

The next picture was taken May 1st, after 15 minutes of sorting into "stay" and "go."


I have no clue what happened after that. I know I bought organizers at one point.

I know I thought about what we needed in it. One new thing was stuff for doing hair. This is right outside the bathroom and doing one's hair here instead of in the bathroom means folks can get in (and out) more quickly. (It is our only bathroom with a shower/tub.)

At some point, I put everything I wanted to keep into the organizers. And just like that, I was out of room.


Then, I stalled on dealing with the stuff in the baskets I no longer wanted to keep here and, frankly, did not know what to do with. I still haven't dealt with all that stuff. It is the last 10% of the project that I always seem to have trouble finishing.

But the drawer is technically done. As is the top.


I will tackle the leftover bits and bobs, eventually.


It's all in the basement. You now, the place where things go to die.

Tuesday, May 21, 2013

Project 21: Hang the Paper Cutter.

This was supposed to be another embarrassingly easy one.

When I first got the idea of hanging my paper cutter, back in February while taking the creative space workshop,  I had no idea how I was going to do it.


When I re-wrote my project list for the anti-procrastination project, I allotted it two hours. Most of that was for researching how to hang it.

I sat down with the computer and typed in some search terms, like "hang paper cutter" and got all sorts of unrelated and irrelevant articles. The same thing happened on Pinterest. It was a good thing that rabbit hole wasn't too deep.

So, I decided to take a look at the paper cutter itself and see what it suggested to me.

It suggested a narrow block of wood for the lip to rest upon.


I went down to my husband's newly built shelves and organized wood pile and found what I needed immediately.


I decided to paint it the same colour as the wall. I found the paint (and the brushes!) easily because of our newly re-organized basement.

I did have to go out and purchase more command adhesive in order to put it on the wall. The plan was to fasten one of the command velcro strips to the wood and the other to the wall.


It was going to be so easy-- and I was happy thinking I did not have to continue to make Swiss cheese out of my walls.


And that should have been that.

Except the Velcro on the command strip gave way.


Twice.

So, in the end, and because I was determined to have a post for today, I didn't say rude things and walk away (well, half that statement is true). No, I used the drill, wall anchors, screws and a level and fastened a block of wood to the wall.


My five minute project took about a half hour.

Here is where I kept the paper cutter. On the floor between the end of my desk and the wall.

sorry you had to see that.

This is where I am keeping it now.


Much, much better.
Related Posts Plugin for WordPress, Blogger...